When we got married we inherited my inlaws 1970’s bedroom furniture. The headboard was a queen, but we bought a king sized bed. I was in need of a headboard and one day I ran across this photo from Better Homes and Gardens:
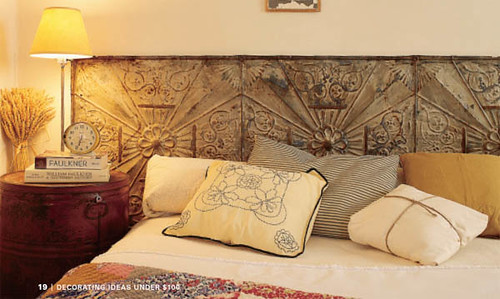
Instantly I fell in love with this idea of using tin tiles as a headboard, but a quick search on ebay gave me sticker shock. In case you are wondering, buying four to five 24″x24″ antique ceiling tiles that look as nice and distressed as those in the picture ain’t cheap.
Then one day, I was strolling through Hobby Lobby and happened to stumble upon an entire display full of tin tiles. And they were all 50% off! Since I’m a penny pinching, tight fisted son of a gun I was jumping for joy at this find!
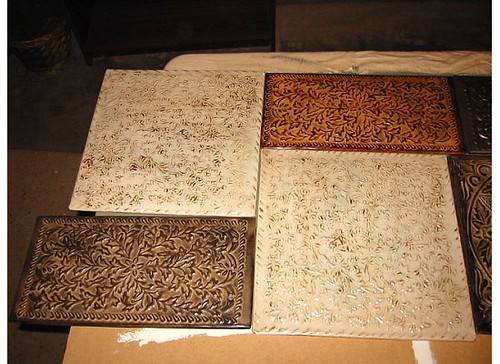
Some were 12″ square, and some rectangular. They didn’t have enough quantity of one particular style or color for me to recreate the look of the BHG one. But as my mind started churning I could picture how I could make them work for my headboard project.
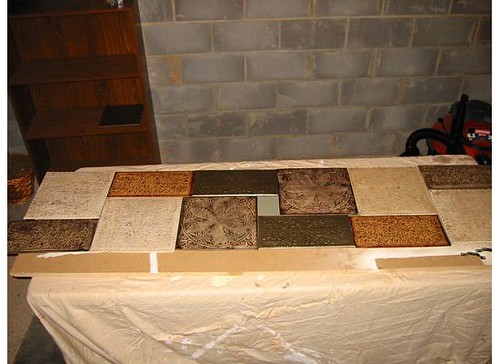
I filled my buggy with tiles and hustled them over to the fake fruit and plastic grape aisle of Hobby Lobby, which was the emptiest one I could find. I started placing the tiles in different patterns on the floor until I found one that agreed with me.

Then I checked out with my haul of tiles and ran home to see if J could help me create a headboard.
He had a big piece of MDF leftover from another project, so we used that as the backerboard. You could use plywood, beadboard, or even nail the tiles right onto the wall if you have mad leveling skillz and don’t mind nailing fourty-leven holes in your wall.
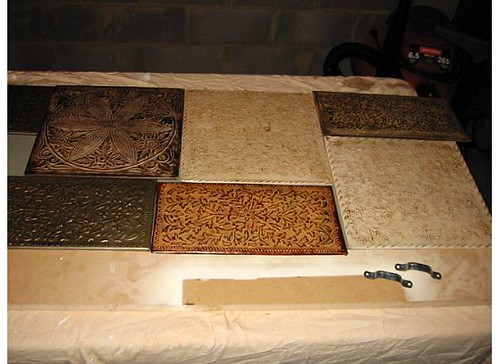
We cut it to the size that I needed, then painted it the same color as the bedroom wall. (SW Connected Grey) Then we hammered each tile into place using tiny finish nails in all four corners.
Here is the end result:
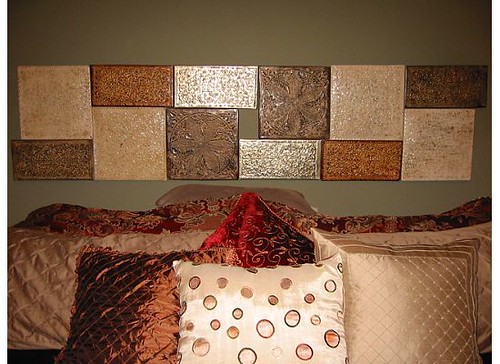
Looking back we should have hung it a little bit lower on the wall, but it accomplished my goal, I think.

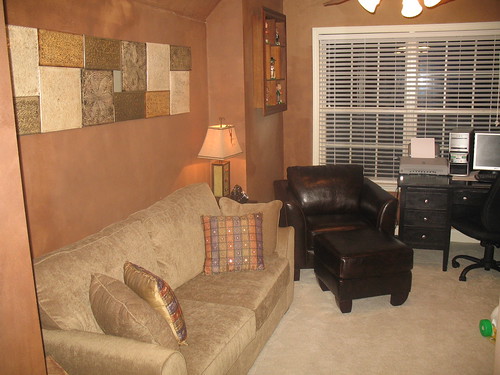
I have since sold the 1970’s furniture on craigslist and upgraded to a phat new bedroom suit, so the tin tile headboard is currently upstairs in the man cave. I think it might look better up there than it did in my bedroom!
This was a super easy project, and I highly recommend trying it out if you are looking for a unique (and relatively inexpensive) headboard idea. Just be sure to use some super heavy duty hangers in large quantities to keep this big mammy jammy from falling on your head in the middle of the night.


Wow! That’s a great idea! Thanks for the inspiration!!
We were some work it through it doers back in the day. And we didn’t have an O’Toodles.
That looks great! (Although, I definitely agree it matches better in the man room) We’re still in the hand-me-down stage of our furniture, so I might have to scope out some tiles myself 🙂
Looks great in the man-room! You are so creative!
That is BEAUTIFUL!!! I have always loved the pressed tin tiles, but didn’t know how to use them. I may have to try that!
It looks really good. You did a great job.
Just coming over for a visit. I have changed all of my buttons.
I have the Knock Off Knock Out party on Mondays and we have a brand new party starting this week. It will be every Wed and featuring Holiday Decor and/or tasty treats. Come on by.
Cheri
Its So Very Cheri
Love this idea… must find a place to make my own! Great job!
~Whitney
What a neat idea and it turned out great! Headboard turned artwork/wall hanging. I love it both ways.
I absolutely love this!!!! Good work! -Kelsee
Very cool!
That looks fantastic!!
great job! I love the way it looks in the man cave. 🙂
gail
Thanks so much for all your kind words! I appreciate it so much!
Do you people have a facebook fan page? I looked for one on twitter but could not discover one, I would really like to become a fan!