
There is a healthy dose of fear and/or respect that surrounds DIY light fixture installation. I feel that the fear of all things electrical keeps a lot of folks tolerating the same old builder grade lighting for years and years instead of finding something new that they love. Even if you grow tired of a light fixture, it seems like a hassle to hire an electrician to come out just to change out a few lights. Well, I’m here to tell y’all that it’s really not that hard to DIY this type of thing. It takes about 10-15 minutes, max. Seriously. My husband has become an old pro at changing fixtures.
I’ve had some Cabela’s gift cards lying around since Christmas, so I decided to spend them on some stuff for the house! Cabela’s is an outdoor/ sportsman kinda joint, but they also have a cabin and home decor section. Now, 99% of their stuff is way too lodge-y for everyday use, but that 1% might surprise you! Kinda like Cracker Barrel, you just never know where you might find great stuff for your house, so keep your eyes peeled. We are big fans of Cabela’s around the Bryan household. So much that they send us a hardbound book every year with all their merchandise. Recently I fell in love with the floor lamps and wall sconces from the Grand River Lodge Collection . I pinned it, and here is what it happens when pins come true:
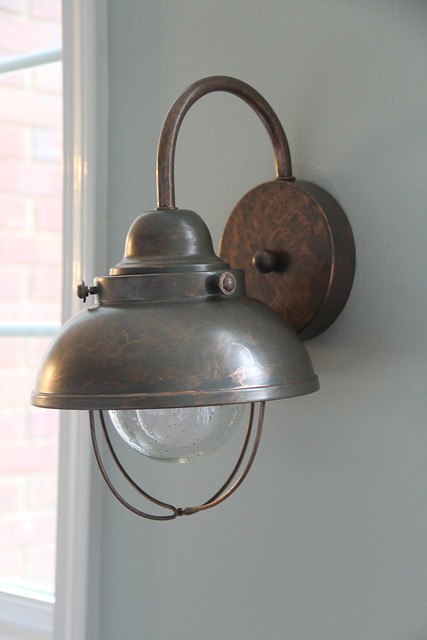
Isn’t it beautiful?
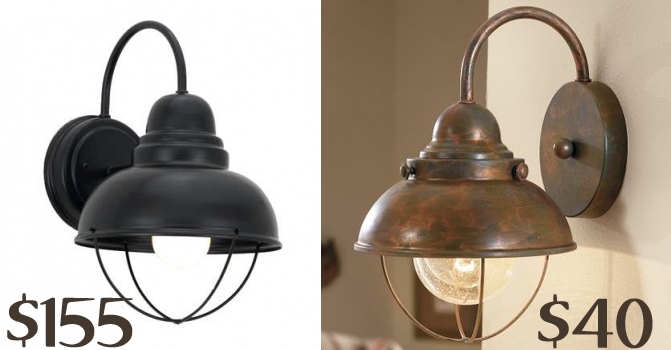
At just $39.99 it’s a steal compared to a very similar one from Barn Light Electric. Here is the “Appaloosa” that costs $155.00 compared to the Grand River Lodge sconce from Cabelas for less than 1/3 the price. I heart Cabelas.
Let me show you how we did it.
First, and most importantly in my opinion, I turned off the power to the breaker that controls this light. Then, my husband took down the old fixture.
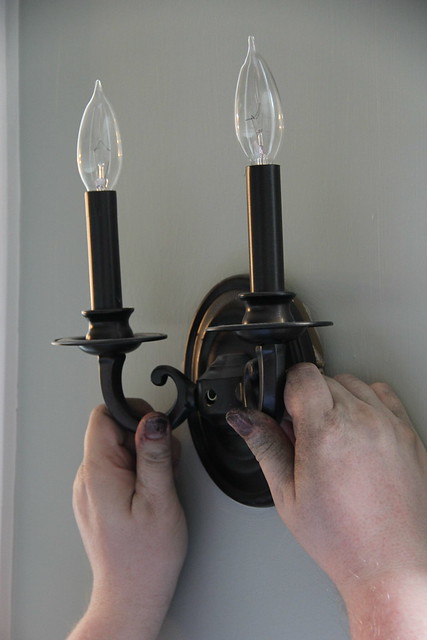
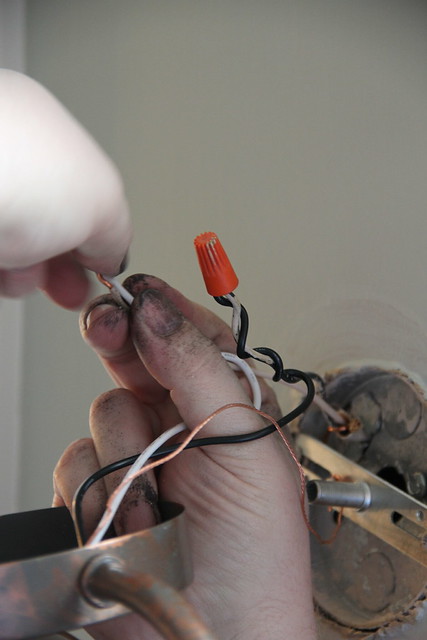
Side note: Please excuse the dirty fingernails of my hard working man. They usually don’t look like that but he had put in a long hard day of pool fence rust removal and spray painting so he had a good excuse! Just had to clarify that for all of you who just went “ew.”
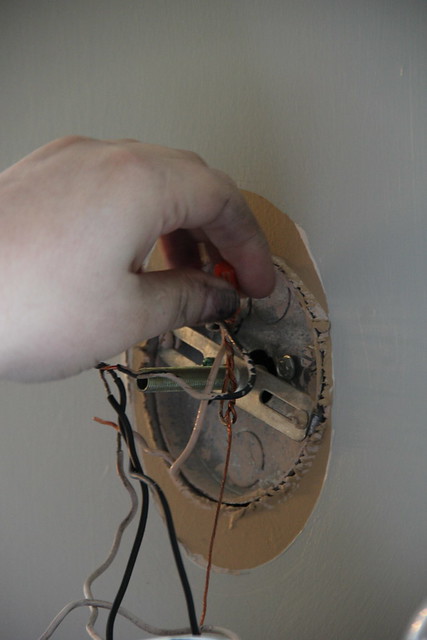
Once he got the light unscrewed this is what it looked like behind.

Unscrew all the little caps and put them in a safe place then untwist the wires from one another.
Since our old fixture was oval and the new one was round I had to break out the touch up paint. This added some time to the project but was definitely necessary. This also shows what a great job Sherwin Williams did of matching up my Restoration hardware sample paint. Once it dried we can’t even tell the difference.

See this rod right here?
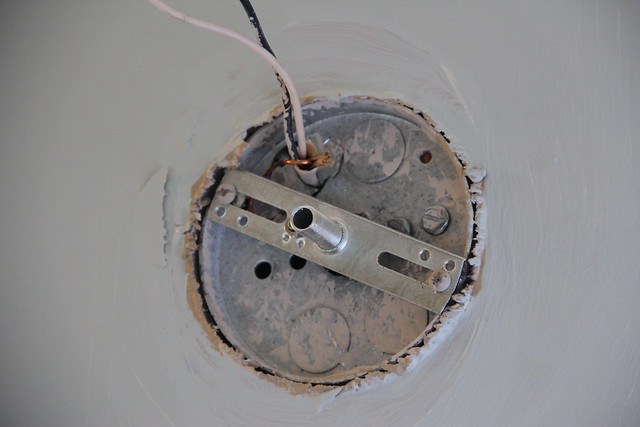
Try to see if your new light will fit onto the existing rod before you go installing a new one. It might fit perfectly and then you’d have wasted time for nothing. We wasted time for nothing. Learn from our mistakes.
Once the paint was dry he simply twisted the wires that are in the wall together with the wires that are inside the new light. Black to black; white to white, copper to copper (ground wire). I know it looks like we have twisted white with black here but the black wire had white paint on it. No worries. Screw the wire caps back onto the ends of each exposed wire.
After that, just stuff all the wires behind the light as best as you can, and screw it onto the threaded rod and boom… just like that, a new light fixture!
I’m really digging it on the staircase wall.

And while I’m showing you that area, lemme show off a few other changes that have happened lately. Look! I hung stuff on the wall! And one of these days I’m gonna put pictures of my family inside that empty frame.

Also, check out my new birch branches that I found this weekend at a local antique place.
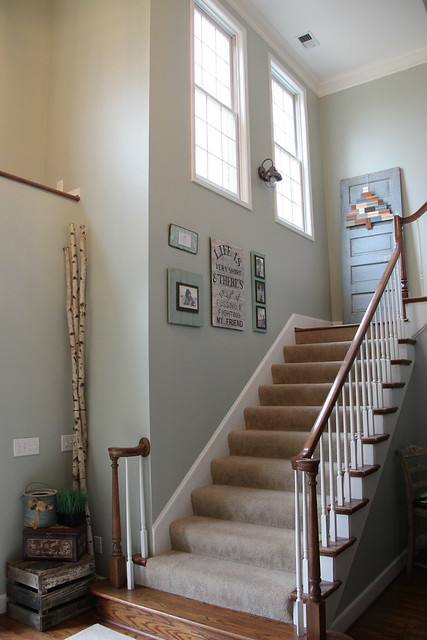
I know that you northerners probably think I’m crazy for paying money for tree branches, but white birch trees just don’t grow this far south, so I’m forced to pay for nature. I figured it was cheaper and easier than driving to Vermont with trees hanging out of my car. I love these guys standing tall in that little entrance nook. I want to mount a picture frame on them but I haven’t gotten that far just yet. Baby steps, right?


Sharing at DebbieDoo’s Copy Cat Challenge

Okay, are you like reading my mind today?!?! I’ve had a light fixture in my garage forever and haven’t had the balls to install it! Thank you for the tutorial!!!!
Love your new light fixture! And those birch pieces are gorgeous- I can see why you would buy them! How long/tall are they? Were they expensive to ship?
The new light fixture is gorgeous, I love it! Who knew that you could find that at Cabelas? I love it on the wall, great choice!
Okay. MY fingers look like tht half the Summer when I am getting my spray paint on in high gear. I just thougt, “Cool, her hubby is so sweet and handy to change tht light out”.
Looks great! I love it.
I have to have skinny, low profile ones on my stairs the way they sit.
That fixture is cool =)
It looks great! I’m glad your hands look like mine 😉
Debbie
Beautiful Beth!!! LOVE IT! And that is was a steal is even better!!! Enjoy my dear!! Thanks for sharing hon!! Hope you have a wonderful day!!
This is such a great resource that you are providing and you give it away for free. I love seeing websites that understand the value of providing a quality resource for free. Pool Fences
magnifique
soln
I love this light fixture Beth. Looks really nice and simple too. Glad you joined the copy cat. Could you please add my link or button though, I ask that of all participating so others know about the party too. Thanks.
Hi Beth, Just read your comment on my blog. Love your new light fixture! You are right, the color matches perfectly on your wall. I got the sample of RH Silver Sage and painted it on a board. It doesn’t look like it does in your house. I know lighting affects it, of course, but in all lights it looks like a very light gray. I am not seeing any of the subtle blue/geen I see in yours 🙁 I got a chip of SW Sea Salt and it looks similar. I am going to try a sample next. Any other suggestions?
That light fixture is fab! I really love your ‘No fussing’ sign too – it all works so nicely 🙂
Amazing! All of it. Seriously, magazine worthy.
I love how you can buy an exact replica for a fraction of the cost.
And your husband ROCKS for being such a handyman! :wub
Great job!! … now can you tell me how to put a sconce in where there is no sconce?? I have a very dark living room corner…
As I visit this page I could say that this post is really great talking about lighting fixtures cedar city, so better to keep on posting!
[…] for this room was the beauty of a floor lamp from Cabelas. I bought this at the same time as my staircase sconce light. I love this line of fisherman lighting from […]
[…] up was a little playing with electricity. How to replace an ugly sconce light for something much cooler shows you just how easy it really is to replace the lighting in your home. Don’t be scared! Just […]
Cabelas should give you a commission … Purchasing.! Sweet deal on lighting. Lve the style. Perfect for MT. Ironically, we cut down a birch in our backyard (died in the drought). Was gonna pitch & my sister (interior designer) said we should bring some of the pieces inside. Made a killer indoor tree in a vase out of them. Cheers*
WOW, thanks so much for the share, have never heard of Cabelas, they have Canadian stores too! Happy girl right now!
Holy cow, I was just at Cabela’s yesterday. Need to run back to check these out. Thanks for the heads up!
[…] If you liked this post, be sure to check out “How to Replace a Sconce Light with Something Much Cooler“! […]
Just came across your post and so happy – have been looking for lights similar for my boys bedrooms. Great price! x
Hello! This post could not be written any better! Reading through this
post reminds me of my previous room mate! He always kept
chatting about this. I will forward this write-up to him.
Fairly certain he will have a good read. Thanks for sharing!
I’m in love with that light fixture and from Cabela’s? Who knew? I also LOVE your sign with the Beatles Song Lyrics.. Might be stealing that idea! 🙂
[…] 6. How to change out your sconces from Unskinny Bop. […]