A laundry chute is one of those home features that sounds like a luxury until you’ve lived without one after having one. Then it becomes a genuine quality-of-life issue.
When we remodeled our attic space, adding a laundry chute from the second floor down to the laundry room was non-negotiable for me. We had one in our previous house and I missed it every single laundry day. Now that it’s installed I can tell you — it is every bit as life-changing as I remembered, especially with kids whose clothes seem to multiply overnight.
Here’s exactly how we did it, what it cost, what surprised us, and what I’d do differently.
What Is a Laundry Chute and Is It Worth Adding?
My original inspiration for this project came from a Parade of Homes that had a laundry chute made from round metal pipe. There was a simple cabinet door smack in the middle of the hallway wall upstairs by the kid’s bedrooms. But when I opeend it up? It was a LAUNDRY CHUTE! The white cabinet door was covering a round ductwork pipe in the wall that dropped into the laundry room below. It was pretty and ingenious.
A laundry chute is a vertical shaft built into the wall of a home that allows you to drop dirty laundry from an upper floor directly into the laundry room below. You open a small door in the wall, toss in the clothes, and they slide down into a hamper or laundry sink on the floor below.
If your laundry room is on a different floor than your bedrooms, a laundry chute eliminates one of the most tedious household chores — carrying laundry baskets up and down stairs. In my experience it’s one of the most practical home improvements you can make for under $500 total.
Can You Add a Laundry Chute to an Existing Home?
Yes, absolutely — but it requires the right conditions. The most important factor is that the space above your laundry room needs to be accessible and free of obstructions like electrical, plumbing, or HVAC running through the wall cavity. In an ideal situation, you have a straight vertical path from an upper floor wall directly down into the laundry room ceiling with nothing in the way.
The best candidates for a laundry chute addition are homes where:
- The laundry room is on the main floor directly below an upstairs bedroom hallway
- There is an accessible wall cavity between those two spaces
- The attic or floor above is accessible enough to drill a test hole first
We got lucky — the empty space beside our attic door lined up almost perfectly over the corner of our laundry room ceiling. Not every home will have this alignment, which is why hiring a contractor or at minimum a handyman to assess feasibility first is worth the cost of an hour of labor.
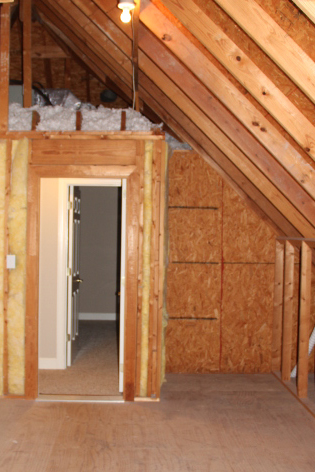
I had been eyeing this spot for a while, doing mental calculations of where a hole should land based on where the laundry room lined up in the downstairs. After pulling some measurements with an actual tape measure… it turns out I was right. The two spaces lined up perfectly.
What We Used — Materials and Cost
- Custom HVAC ductwork chute — $200 (fabricated by our HVAC company)
- Cabinet door for wall access — standard small cabinet door, framed with 1x4s
- Drywall, sheetrock screws, joint compound — for patching around the opening
- 2×4 framing lumber — for framing the access opening
- Paint — to finish the wall around the door
Total project cost: approximately $350-400 including labor for the custom fabrication.
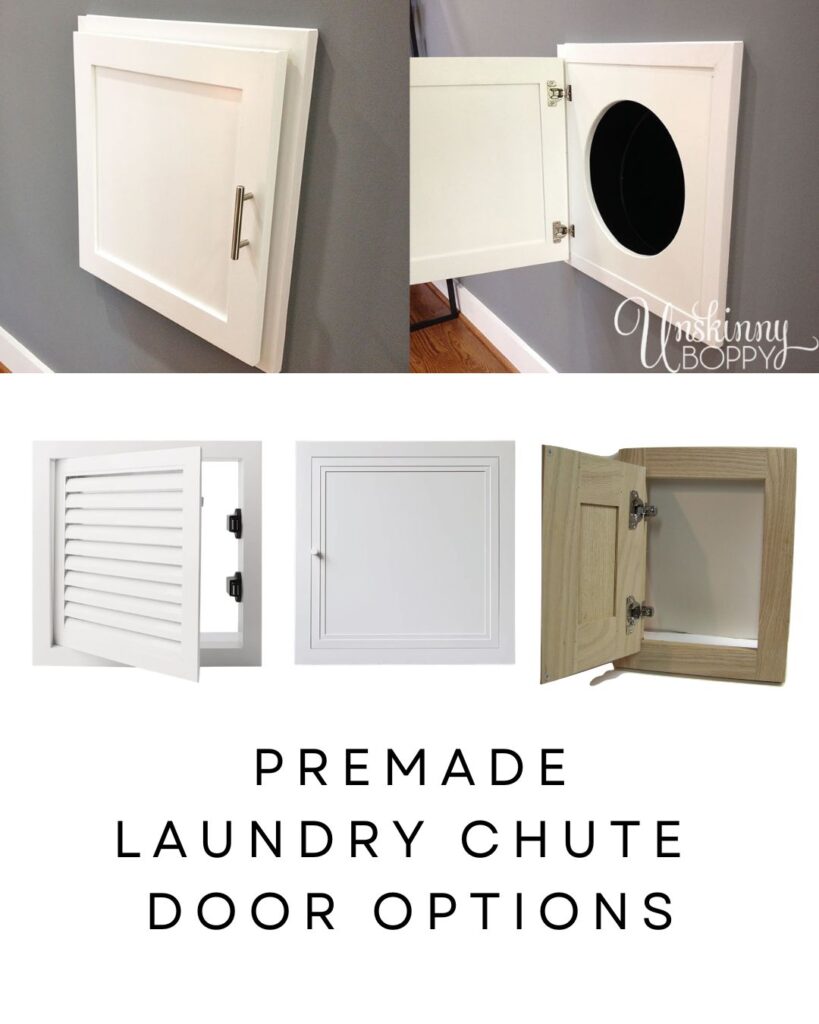
- 12 x 12 White Louvered Cabinet Door
- 12 x 12 Picture Molding Framed Cabinet Door
- 12 x 12 Shaker Style Solid Oak Cabinet Door
Time needed: 3 days
How to Add a Laundry Chute to Your Home — Step by Step
- Step 1: Plan Your Route and Verify Alignment
Before cutting anything, spend time mapping out the path your chute needs to travel. Start from where you want the access door upstairs and trace a straight vertical line down to where the clothes will land. Hopefully in your laundry room, but it could be a closet, basement or other area.
The way we verified alignment: our builder cut a small rough opening in the laundry room ceiling first to make sure he would not hit a floor joist or plumbing, then drilled with a long drill bit straight up through the subfloor above. We went upstairs and there was the hole, right where we wanted it. Simple and effective.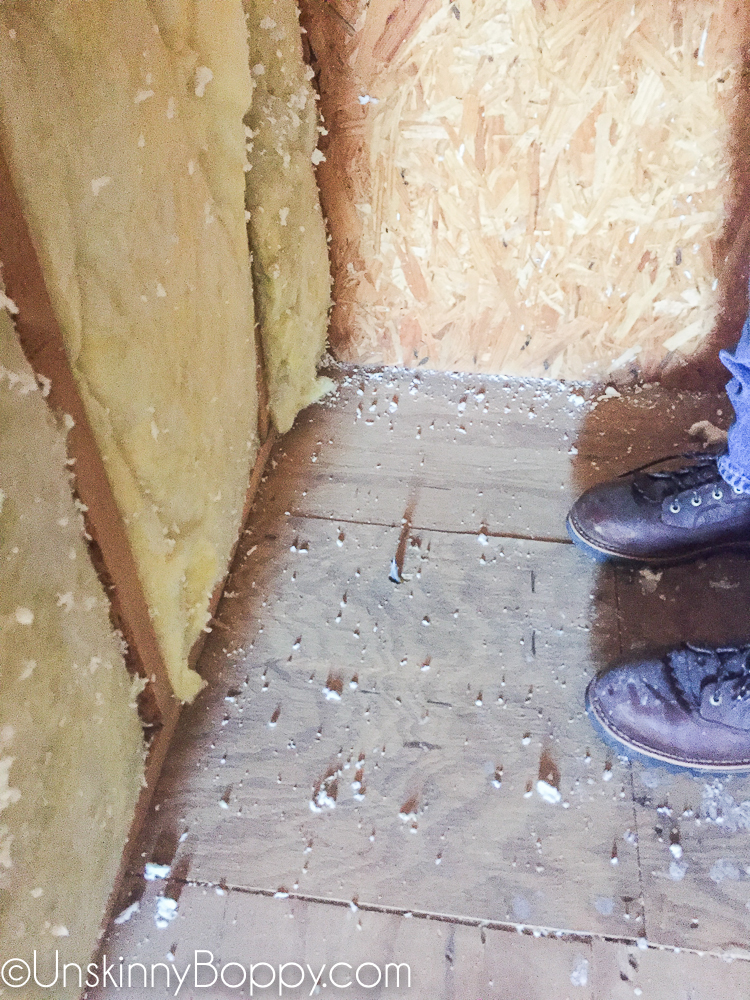
If your path is not straight — meaning there’s a floor joist, beam, or other obstruction in the way — you will need angled ductwork sections to navigate around it. Your HVAC fabricator can build these to spec. - Step 2: Cut the Opening Between the Floor and Ceiling
Cut a matching square opening through the subfloor of the upper level and through the ceiling of the laundry room below. These need to align with each other and with the wall opening above.
Use the predrilled hole from Step 1 as the center guide for these cuts.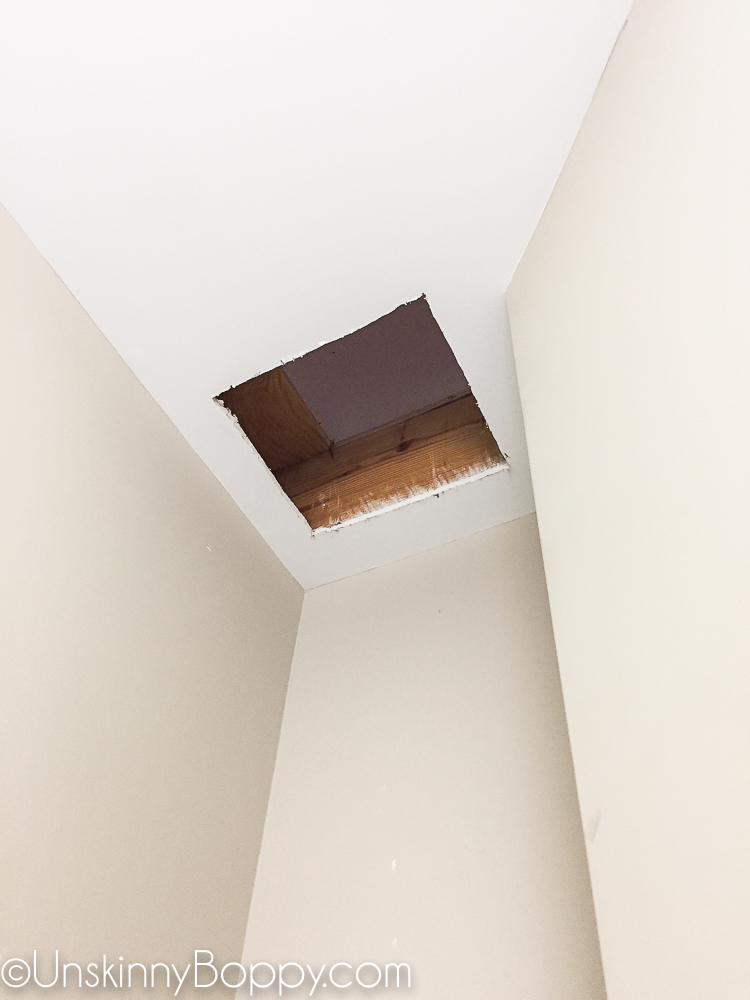
- Step 3: Cut the Access Opening in the Upstair Wall
Once you’ve verified your alignment, mark the opening on the upstairs wall at a comfortable height.
I wanted it high enough so that it was comfortable for my son to toss his clothes into without having to bend over when he got older, so roughly chest height for a child, which is about waist height for an adult.
We agreed that 36″ above the finished floor to the top of the chute was ideal.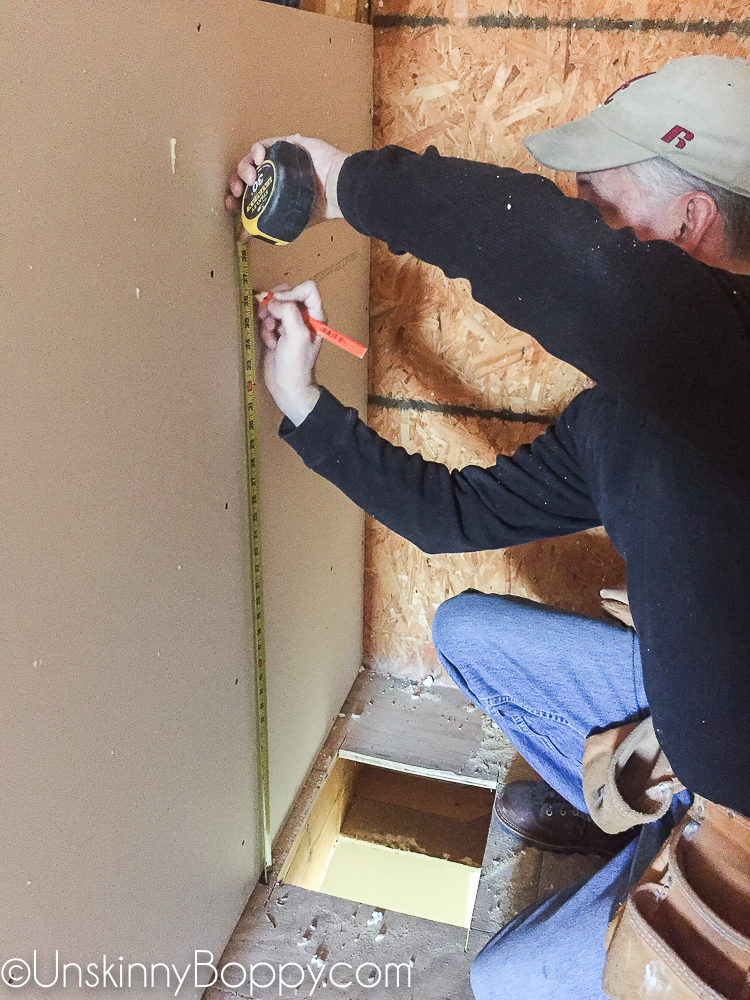
Check inside the wall cavity before cutting to make sure there are no electrical wires, pipes, or other obstructions in your cutting path.
Cut a clean opening using a drywall saw or oscillating multi-tool. Later you’ll frame the opening with 1×4 lumber to give it clean edges and a surface to mount the door.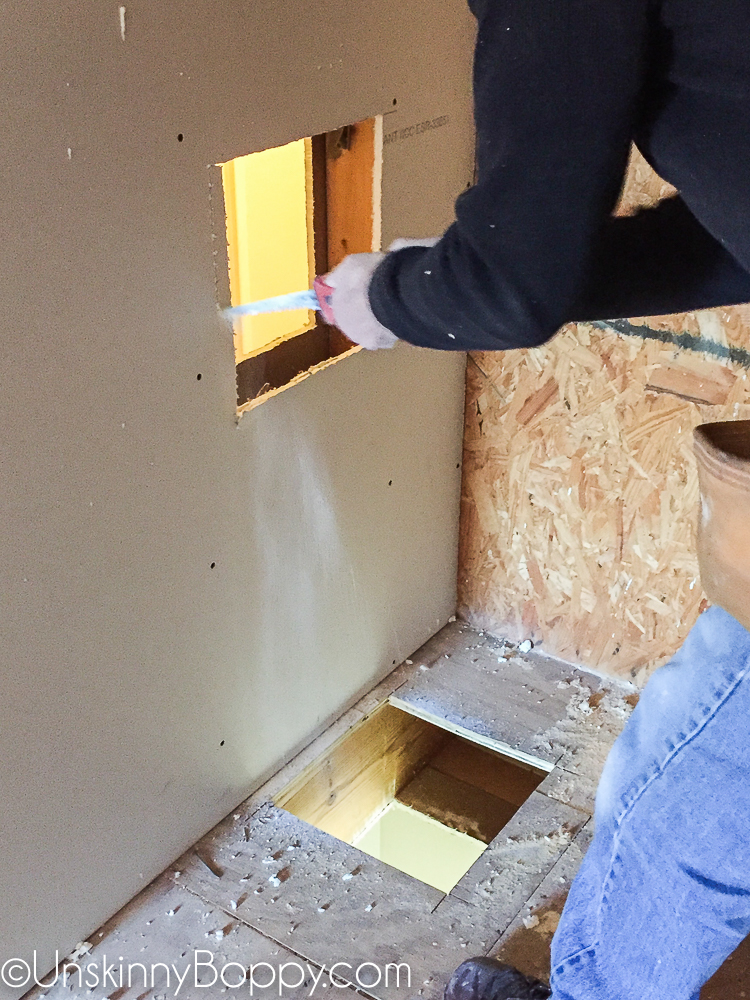
- Step 4: Source Your Chute
This is the step most laundry chute tutorials skip, and it’s the most important thing I can share from our experience.
There is almost nothing sold commercially as an all-purpose ready-made laundry chute pipe. I searched everywhere — hardware stores, home improvement stores, online — and found very little that was sturdy enough to actually work.
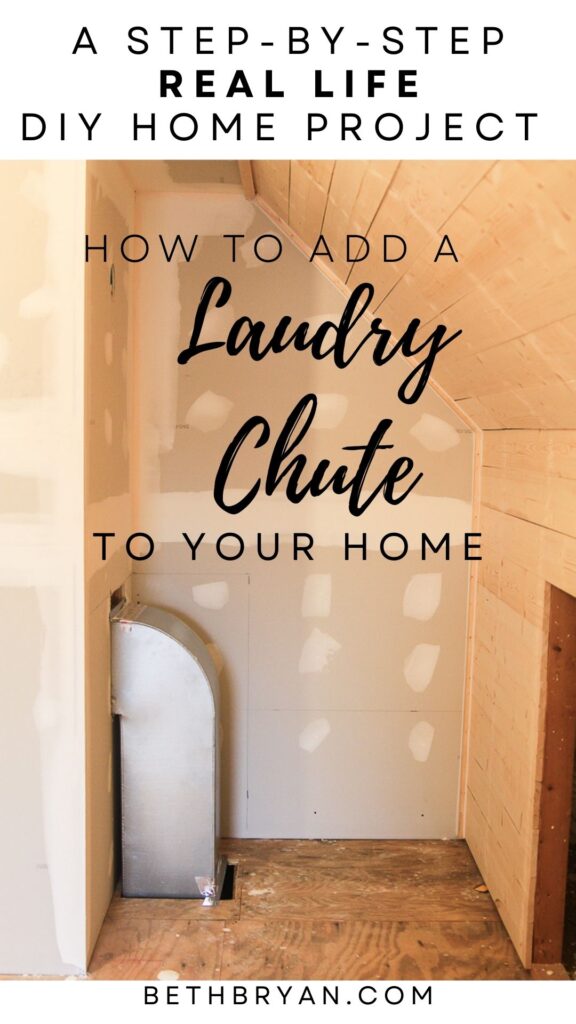
The solution that nobody talks about: call your HVAC company. HVAC companies fabricate custom metal ductwork to any shape and size as part of their normal work. We asked ours to build a rectangular metal chute sized to fit our wall cavity, with a smooth interior surface for clothes to slide down. They measured everything and came back with exactly what we needed for $200. It took them about a week to fabricate.
The chute was installed in the wall, strapped to the framing so it doesn’t move, and it has been solid for years.
If your path is straight and your wall cavity is a standard width, you may be able to use standard HVAC rectangular duct sections from a home improvement store and connect them yourself. For anything custom — angles, bends, or non-standard sizing — call an HVAC company.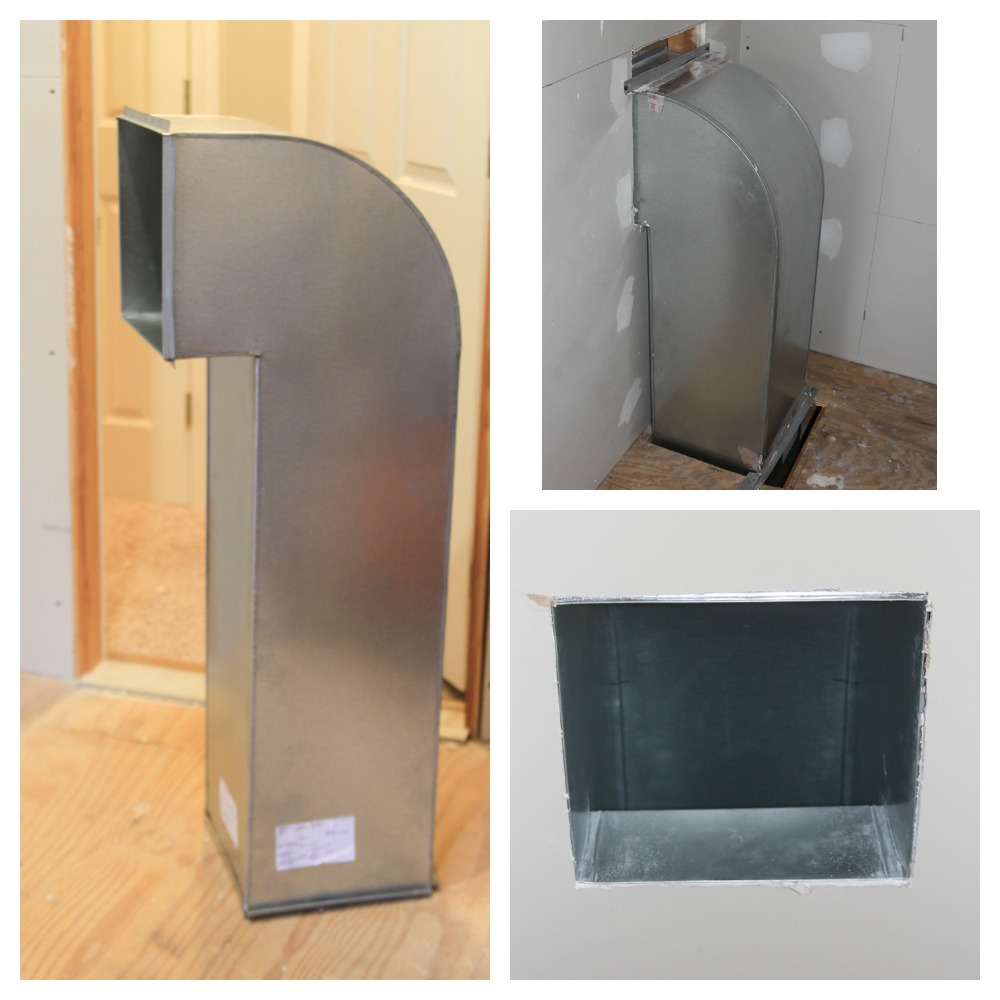
- Step 5: Install the Chute
Attach the fabricated chute onto the wall from the upper floor, aligning it with the laundry room ceiling opening below.

Strap it to the wall framing at the top and bottom using metal strap brackets to keep it from shifting.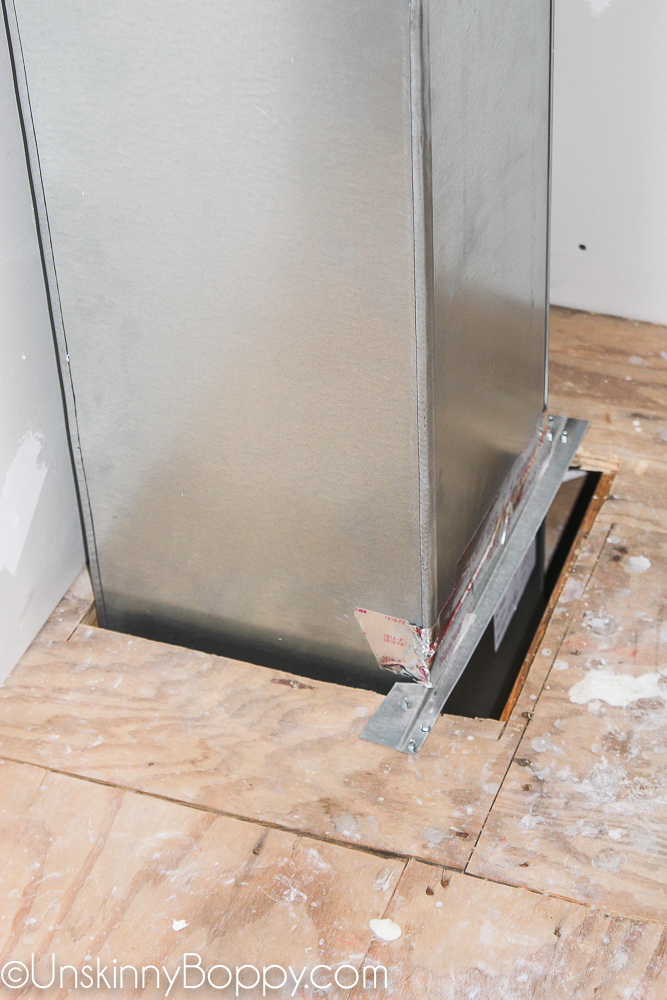
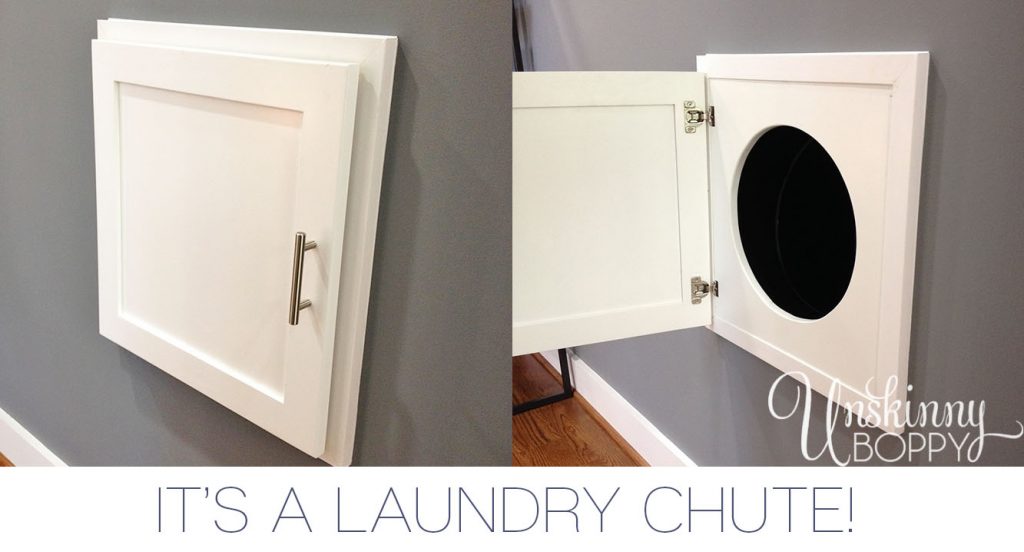
The bottom of the chute should terminate cleanly in the laundry room — either directed into a large hamper, a laundry basket, or in our case, we use a laundry sink that we don’t otherwise need. The clothes slide down and pile up until laundry day. My son still yells “Wheeeee!” every single time he uses it. - Step 6: Install the Access Door
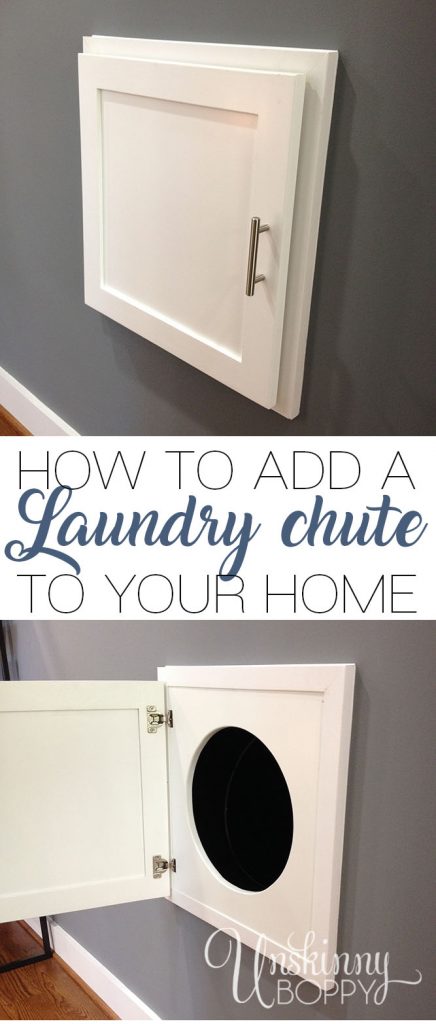
Frame out the wall opening with 1×4 lumber and hang a small cabinet door on hinges. A simple overlay door works perfectly — you want something that opens easily with one hand since you’ll often be holding laundry in the other.
We used a plain white cabinet door that matches the trim in the hallway. It looks intentional and built-in rather than like a patch job.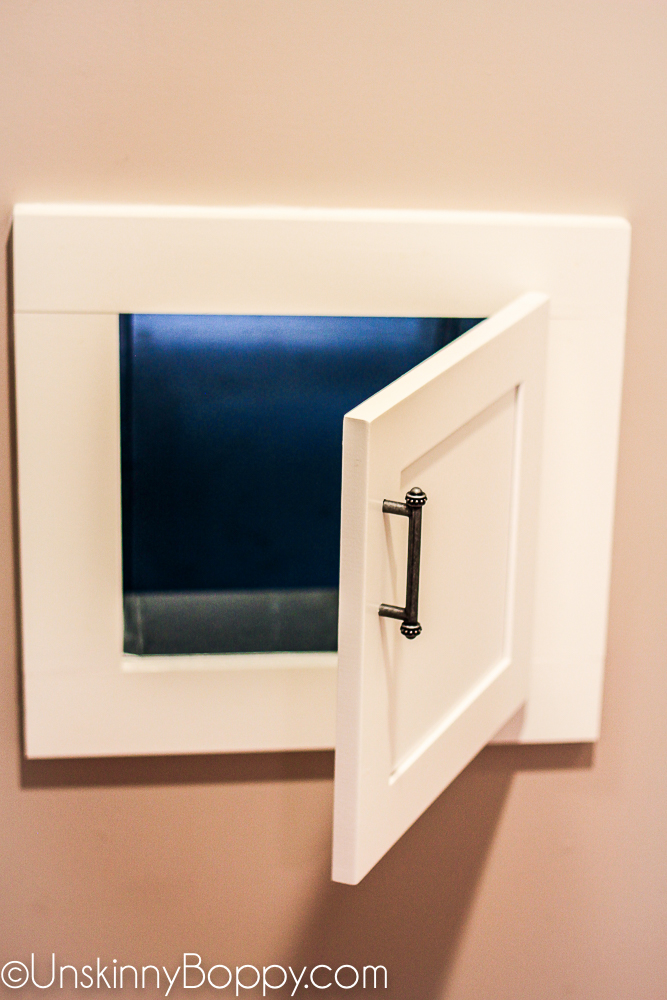
Patch, sand, and paint the surrounding drywall to finish the opening cleanly. - Step 7: Finish the Landing Zone
In the laundry room, finish the ceiling around the chute opening with drywall and paint. Decide where clothes will land — a large laundry hamper positioned directly under the opening works well, or in our case, the laundry sink does the job perfectly.
Down in the laundry room, the clothes just fall out of a framed hole in the ceiling and land on a board we have wedged into place up against the laundry sink. They slide down into the laundry sink and pile up until they are ready to be washed. I never use my laundry sink anyway, so this is no great loss.
Until we find a better solution or build in some cabinetry, this is working just fine. I just imagine the clothes squealing “Wheeee!” as they slide down the boards and land in the sink.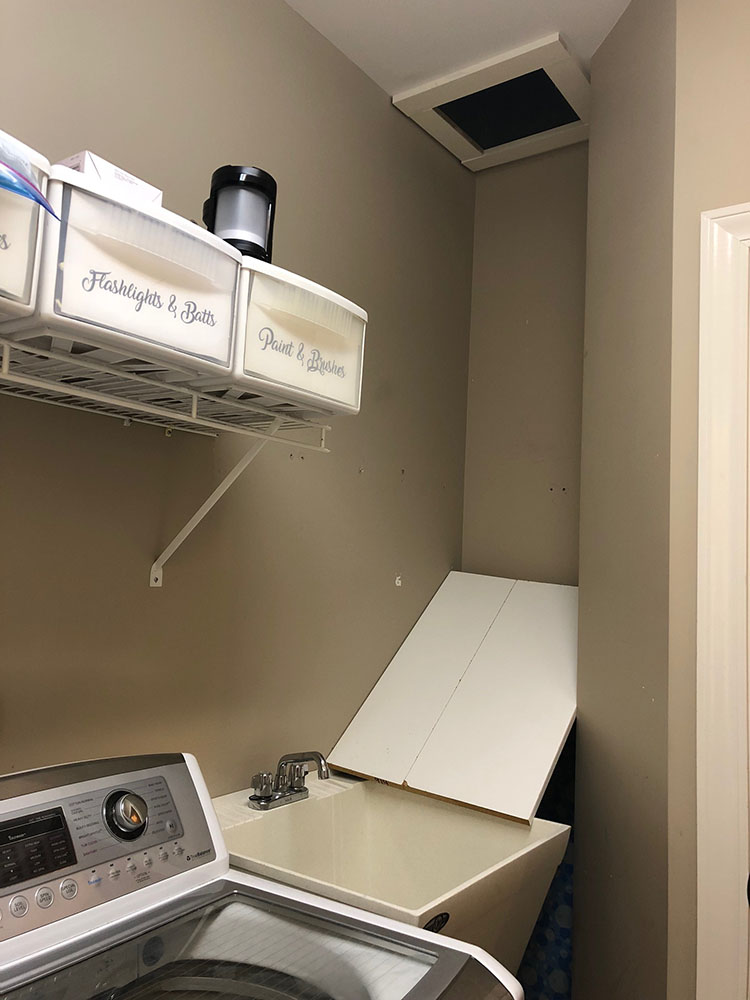
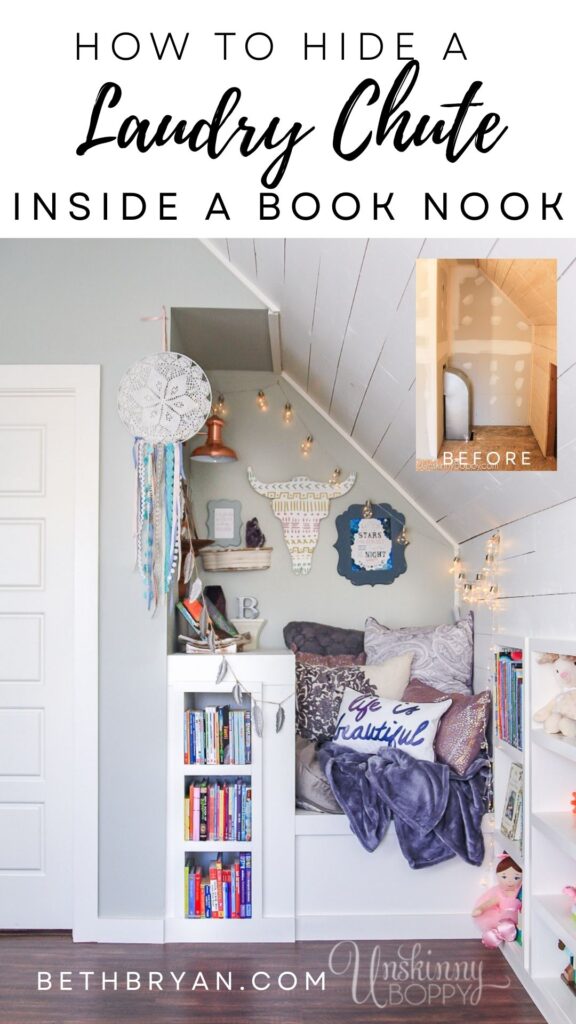
The last thing on the agenda was to figure out a way to hide the laundry chute in the new attic playroom. I contemplated installing a “secret door” into my son’s bedroom, but we couldn’t make that work out. Finally, I decided on a book nook.
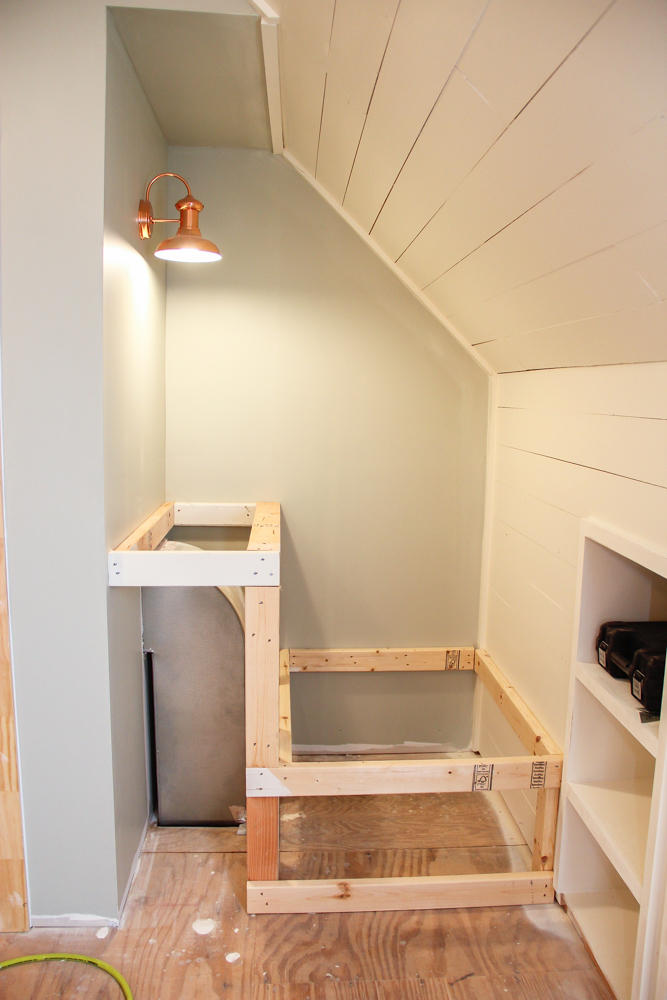
And that’s what we did! Here is the nook before it’s totally completed. He framed it out with sturdy 2×4 construction so it would hold plenty of weight.
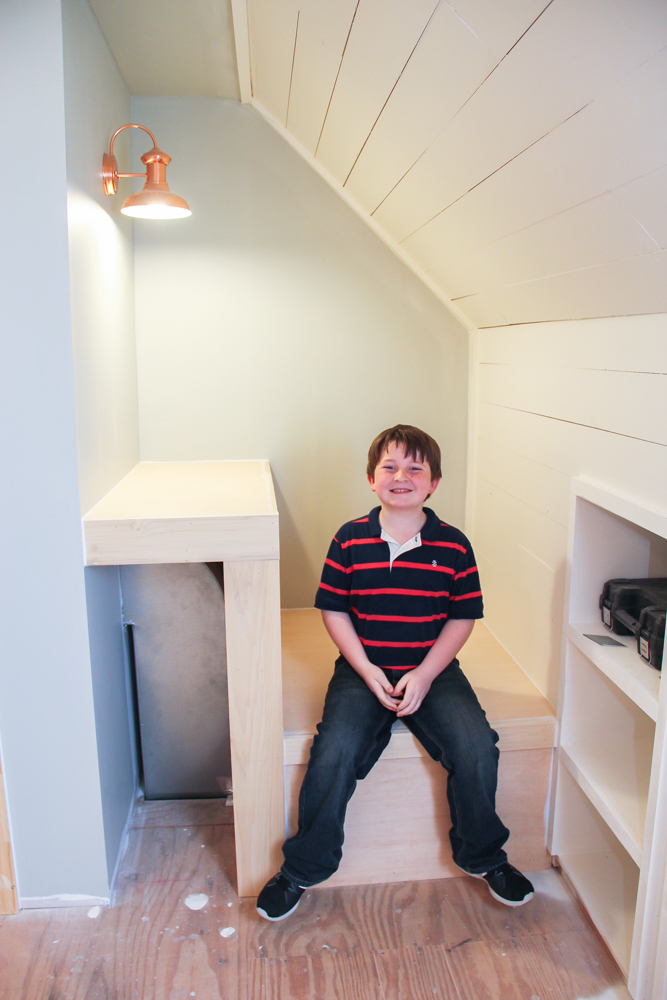
And here it is after the Purebond plywood has been added to the frame. It’s super sturdy!
Upstairs, though, the ugly attic nook was transformed into this magical space: Click here to read about The Book Nook.
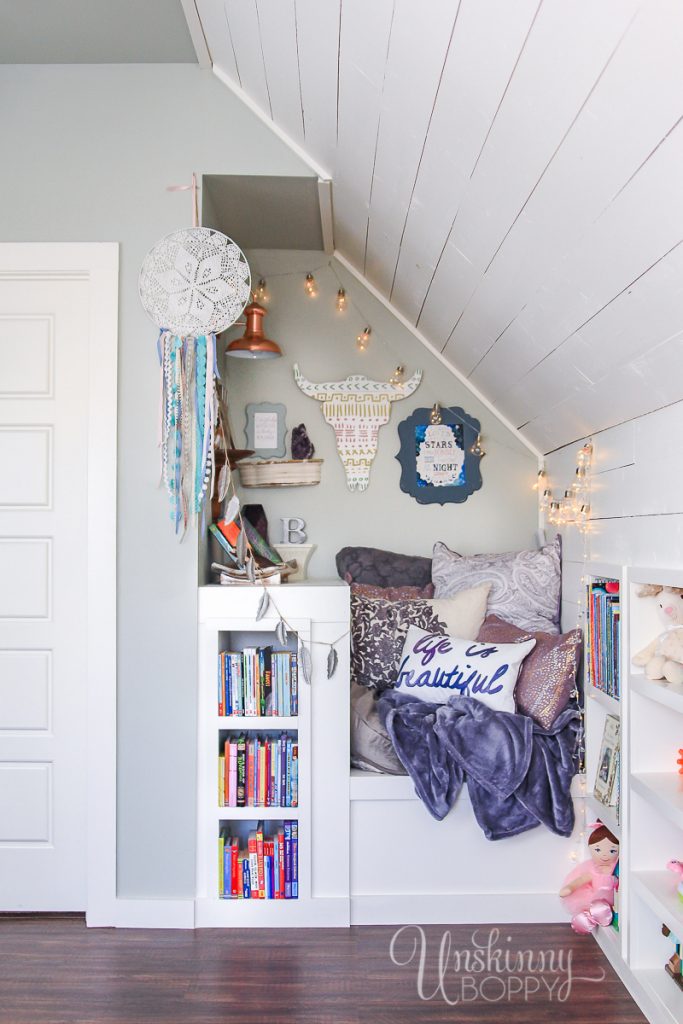
So now we have a laundry chute AND the coolest book nook east of the Mississippi! It’s even gotten its own magazine feature.
If you happen to see the August/Sept edition of Family Fun magazine, you’ll see us featured in the article about reading nooks!

I’m so happy to have this new laundry chute in our home. It gets used every single day, and I appreciate how much convenience it adds to my life. Now if only I had a way for it to automatically fold my clothes, I’d be all set.
The total cost to add a laundry chute to an existing home typically runs between $300 and $600 depending on whether the path is straight or requires angled sections, and whether you hire a contractor for the drywall and framing work. in 2017, our project cost approximately $350-400 total including the custom HVAC fabrication at $200.
Not every home is a good candidate for a laundry chute. The key requirement is a clear vertical path between an upper floor wall and the laundry room below with no obstructions like electrical, plumbing, or HVAC running through that wall cavity. A contractor or handyman can assess feasibility in about an hour.
The best material for a laundry chute piping is custom-fabricated metal HVAC ductwork, made by an HVAC company. Commercial laundry chute products are limited and often not sturdy enough for a permanent wall installation. HVAC ductwork is made from galvanized steel, has a smooth interior surface that clothes slide down easily, and can be fabricated to any size or shape for around $150-250. You want something where clothing and fabric will not snag or get caught.
A laundry chute should be at least 12 inches wide and 12 inches deep to accommodate bulkier items like jeans and sweatshirts. Wider is better — 14 to 16 inches is ideal if your wall cavity allows it. Going too narrow means constantly getting items stuck.
Where should a laundry chute door be located?
The ideal location for a laundry chute access door is in a hallway wall near bedrooms, at a comfortable toss height — roughly chest height for adults, which is about waist to chest height for children. Avoid placing it inside a bedroom closet where it can trap odors, and avoid placing it in a bathroom where moisture can be an issue.
A laundry chute can be a fire hazard if not properly constructed because it creates a vertical shaft that can act as a chimney and allow fire to spread between floors. To minimize fire risk, use a metal chute rather than plastic or wood, install a self-closing fire-rated door on the access opening, and ensure the chute terminates in the laundry room with no open gaps around the framing. However, I personally felt that the HVAC metal piping situation was not much different that the existing air conditioning piping, so it was not a concern for me.
Always check your local building codes for specific requirements.
A laundry chute can develop odors over time from accumulated lint, moisture, and dirty laundry sitting in the shaft. To minimize smell, clean the chute periodically by dropping a dryer sheet down it, ensure the landing zone hamper or sink is emptied regularly, and make sure the access door seals properly when closed.
The drywall cutting and framing portions of a laundry chute installation are within reach of a confident DIYer. The chute fabrication is best left to an HVAC company. If you are not comfortable cutting into walls or working around electrical and framing, hiring a handyman or general contractor for the installation is recommended.
The physical installation of a laundry chute — cutting the openings, installing the chute, and finishing the walls — takes approximately one to two days of work. Factor in additional time if you need to order or fabricate a custom chute, which can take a week or more depending on your HVAC company.

Hopefully, this article helps all of you who are searching for ideas on how to install a laundry chute in your house. As long as the spaces line up, it was not very hard at all.
| If you want to see the details of the attic book nook, click here:  |
If you want to see the rest of 
|

Love the laundry chute! That is a clever way to design it! I didn’t realize there would be anything in the chute (galanized steel?) to actually hold the clothes as they slide down to the laundry room. I’m glad you shared this with us.
Thank you Barb!
Genuinely no matter if someone doesn’t be aware of afterward
its up to other users that they will help, so here it takes place.
This is amazing!!!! would make my life so much easier, and maybe my kids would put the closes up instead of leaving on the ground.
Sooo lucky everything was right it was supposed to be!!!! It’s 😍 beautiful