
When we sold our old house, one of the things we were most sad to leave behind was our finished basement. We put in so much work to make that basement beautiful, so it really hurt to give it up. The movie room with all that amazing molding and those gorgeous cabinets?? I was sad to leave them behind. Click here to tour the basement in the old house.
BUT… our new house had a large unfinished basement space that we knew we could make functional for our family.
We knew going into this project that it would not be nearly as decorative and crown-mouldy as the old one. Mainly we just wanted a large open space to serve as a rec room for entertaining and another smaller room for J to have an office. We also wanted some really big storage spaces that could be closed off to not see all of our ugly junk.
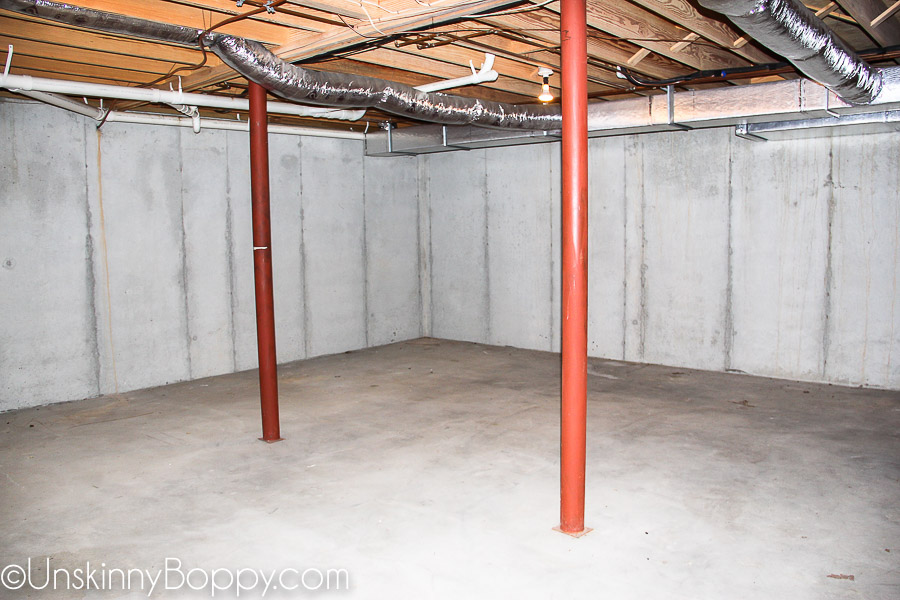
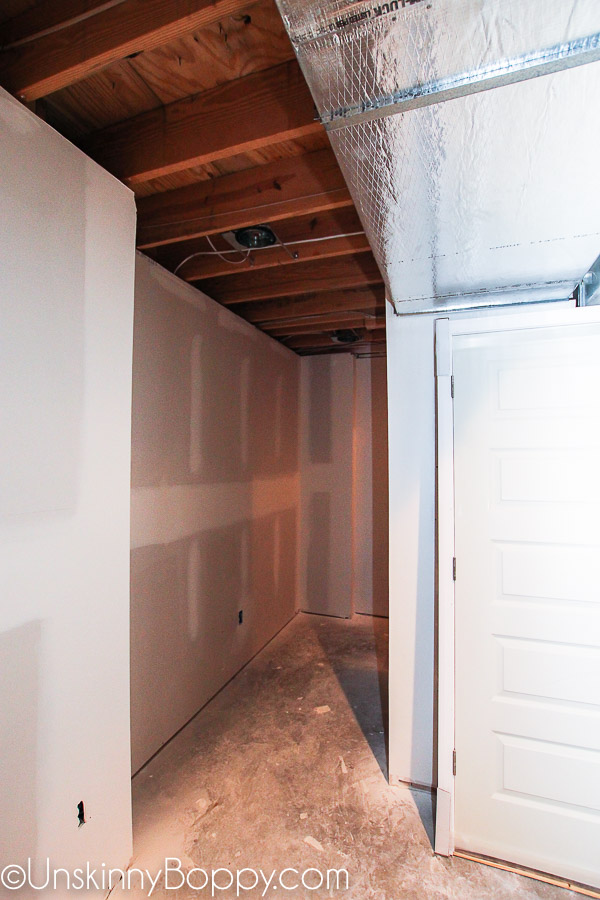
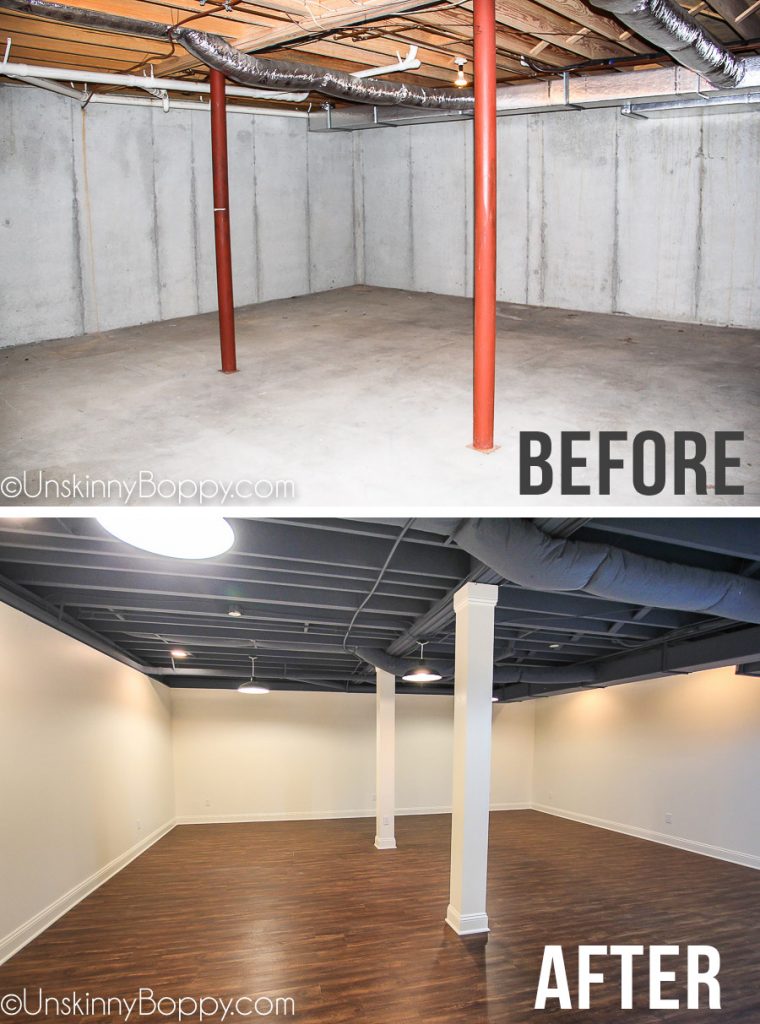
Here are the “Before” photos so you can see what we were working with.
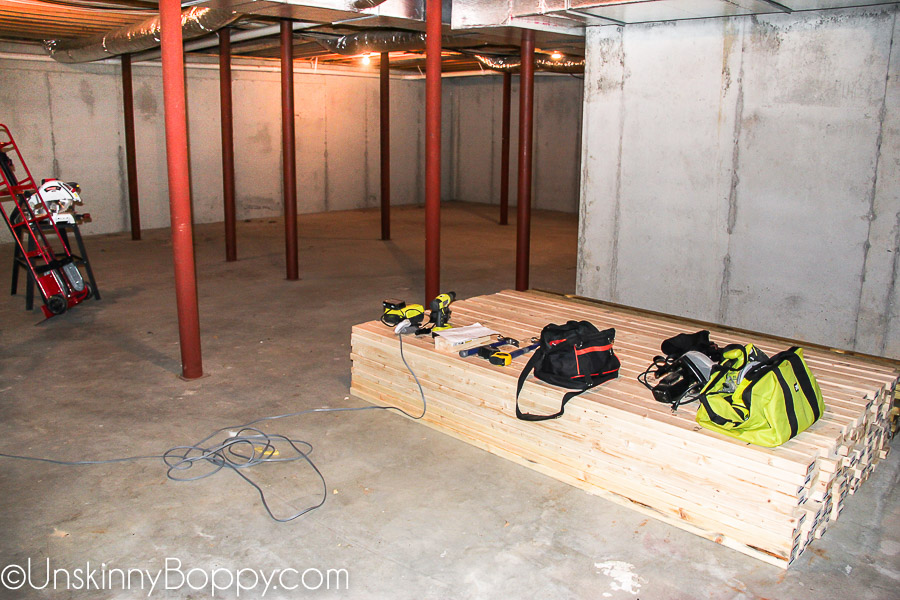
Just a standard issue poured concrete basement. Big, open space. No windows, no plumbing. Very straightforward.
The Biggest Basement Challenges
- Eight metal support poles to work around
- Super low ceiling height
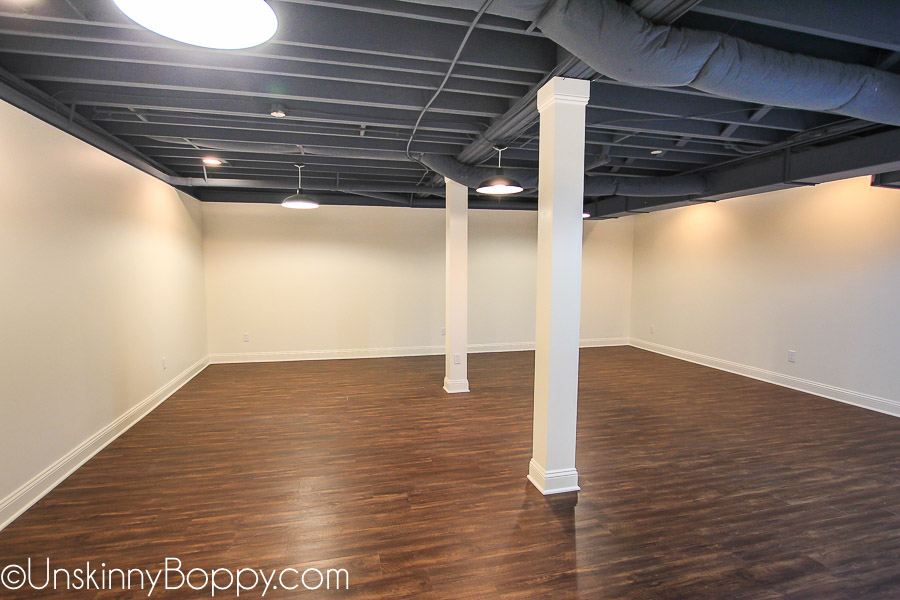
One of the biggest, if not THE biggest, downsides to this house was the basement ceiling height. The ceiling is SUPER low down there, at some points it’s barely above 6′-8″ high. Considering my husband is 6′-2″ high, this was a serious issue. We knew that we would never be able to put in a sheetrock or drop ceiling down there because it would lower the ceiling height even further.
You can see the doors leaning against the wall here- they are 6′-8″ high and they barely wiggle under that air duct.
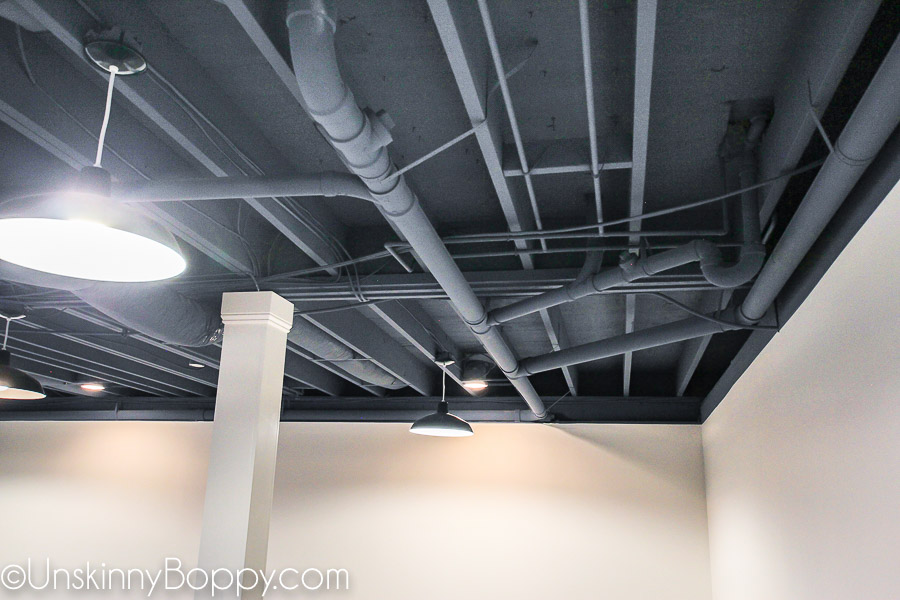
So, we needed to find a better solution. At first we talked about spraying everything matte black for that industrial vibe, but I worried a dark black ceiling would visually lower the ceiling height even further. Then we considered spraying the whole ceiling bright white, but we decided that would not look good either with all the nails and junk that was sticking out of the rafters.
If you want to see an example of what a painted white basement ceiling looks like, check out my friend’s room over at One Project Closer: How to Paint a Basement Ceiling with Exposed Joists for an Industrial Look
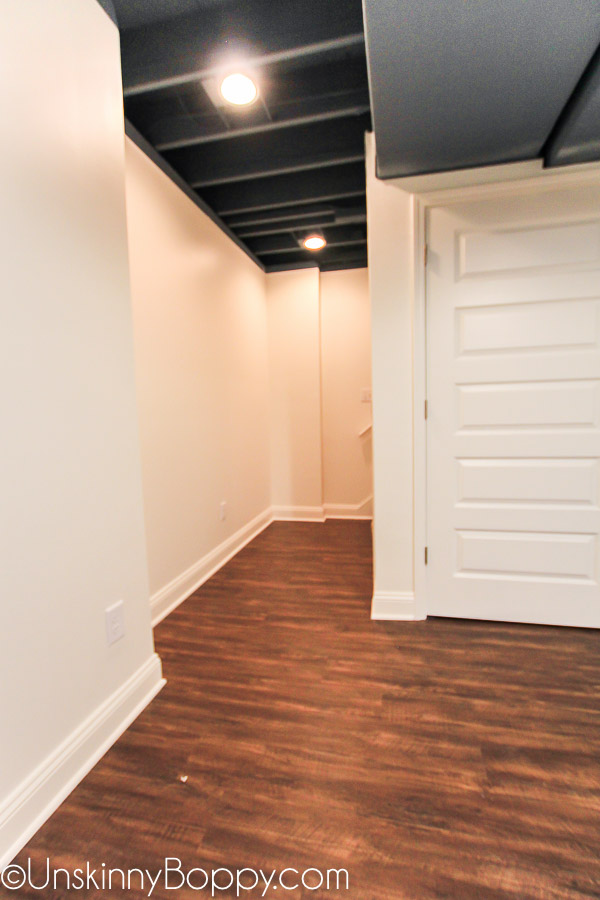
Soooooo we finally compromised on a matte blue color.
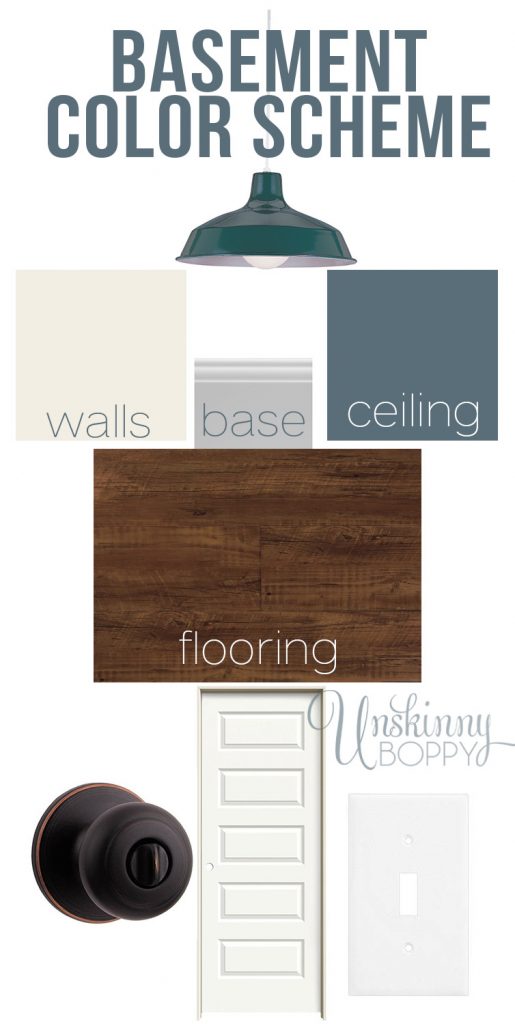
We chose Sherwin Williams Smoky Blue (SW 7604) in a flat finish. This is the same color that we used on the ceiling in the old basement movie room, so we knew that we already liked the color.
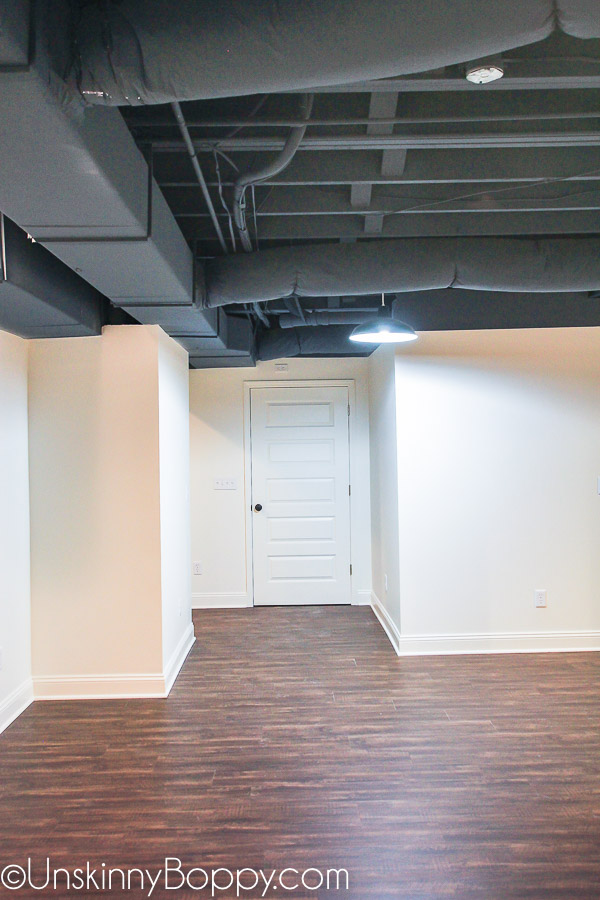
Since there were so many pipes and ducts and things blocking different parts of the walls, I was really concerned that it would hard to figure out where the walls ended and the ceiling began.
To even everything up, we chose a line on the wall that was relatively clear from obstructions to use as our guideline. Everything above the line was sprayed blue and everything below that point was painted a crisp, clean white color. (Sherwin Williams Westhighland White- 7566)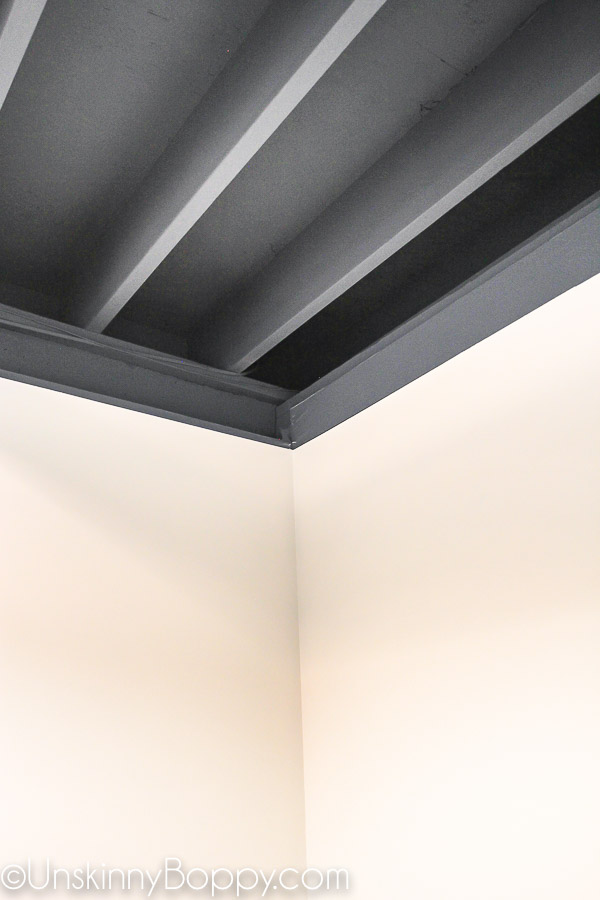
My AWESOME painter, Francisco, has done all the painting in our old houses and most of the painting in our new house too. He is the best of the best, so if you ever need a good painter in the Birmingham area give me a shout so I can give you his number. Hola, Francisco! He sprayed the entire ceiling in just one day using his big industrial paint sprayer.
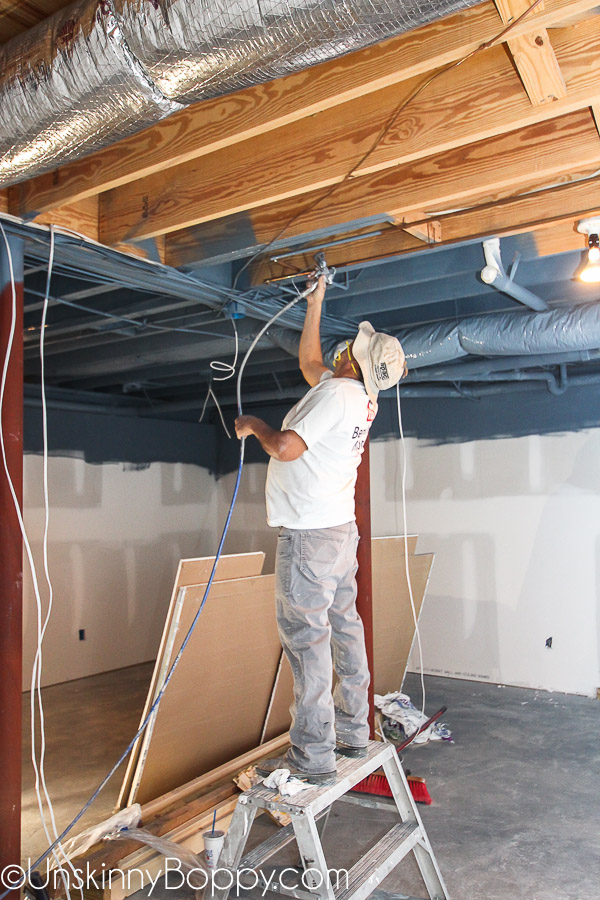
BUY A GOOD PAINT SPRAYER
I HIGHLY recommend a heavy duty paint sprayer if you plan to tackle this job. A small sprayer just ain’t gonna cut it for a 1,000 sq ft + job.
Check this out:
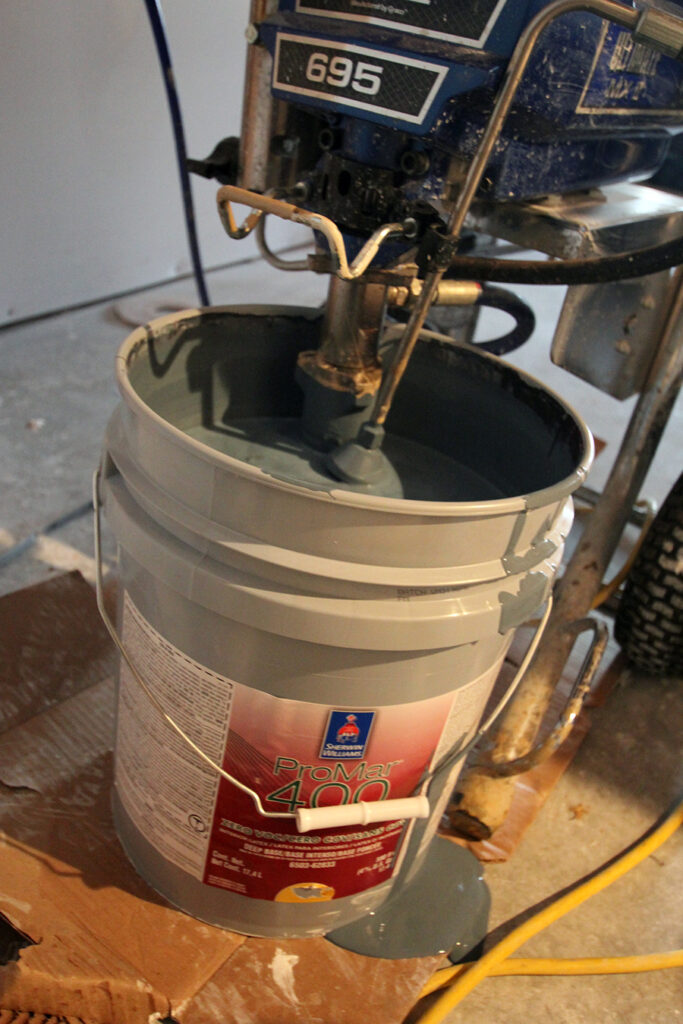
You can hook a 5 gallon bucket of paint up to it and you don’t have to keep refilling it over and over. That is an amazing timesaver. Think of all the trips up and down the ladder that will save you.
The Graco 695 Ultra Max paint sprayer that he used was a contractor version that is likely out of the price range for most of us, but there are cheaper options that do the same thing.
This one is still pretty expensive.
This one is way more reasonably priced for the average home DIYer.
Well worth the investment for this huge project, in my opinion.
MY POLE DANCING WOES
Ok, on to dilemma #2.
See alllllll of those red metal poles? Since I did not want my house to fall in around my ears one night while I was watching Outlander, all eight of those metal poles had to stay in place.
They were also not in alignment with any main walls, which was frustrating.
I just had to figure out how to pole-dance my way around them. 😉
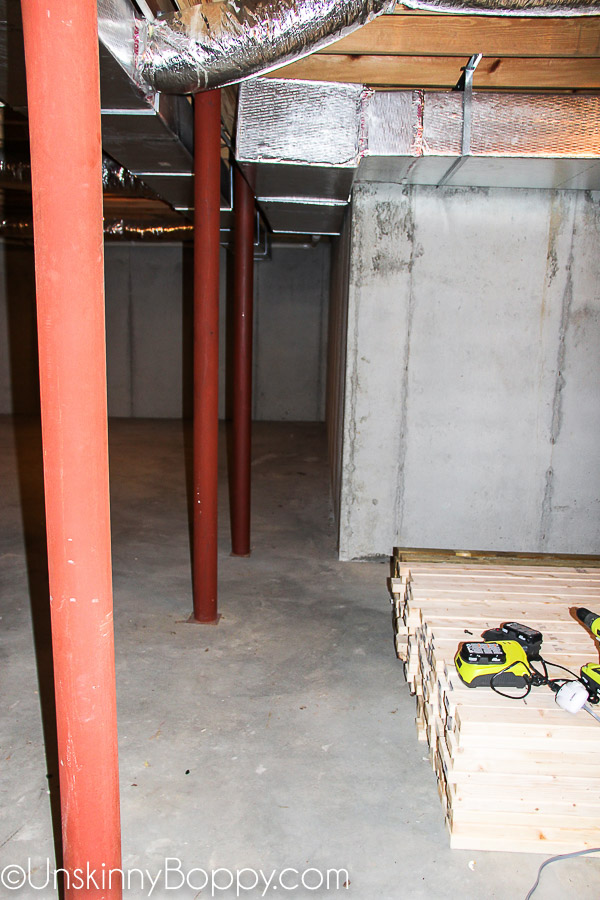
So I set out to draw up a floor plan that would hide as many of the metal posts as possible inside of closets or storage spaces. Here is what I designed:
![]()
You can see from the Key that the small aqua blue circles are all the metal support poles. The other circles are pendant lights and can lights that we added in the ceiling, so don’t let those confuse ya. I managed to work up a plan that placed five of the poles inside closets and left one more out in the unfinished area.
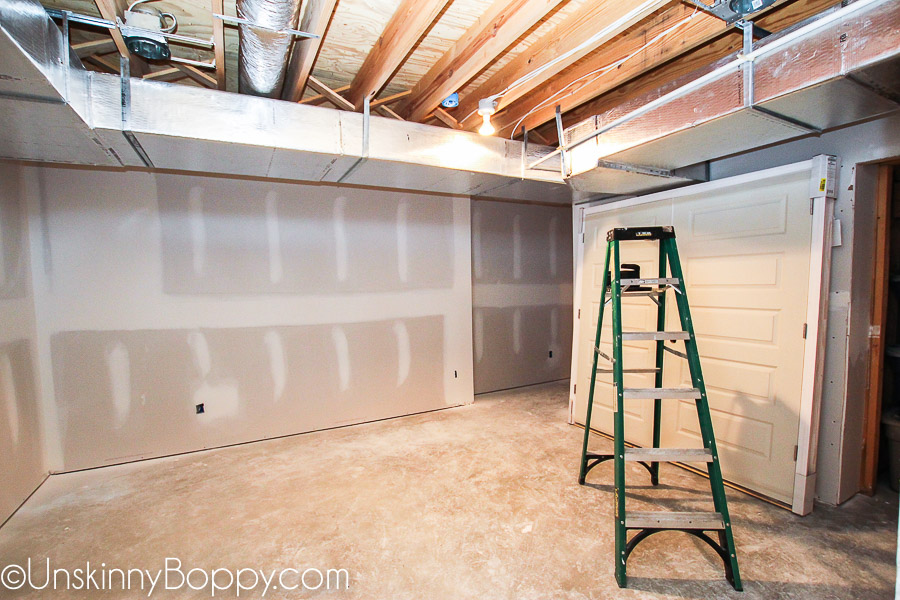
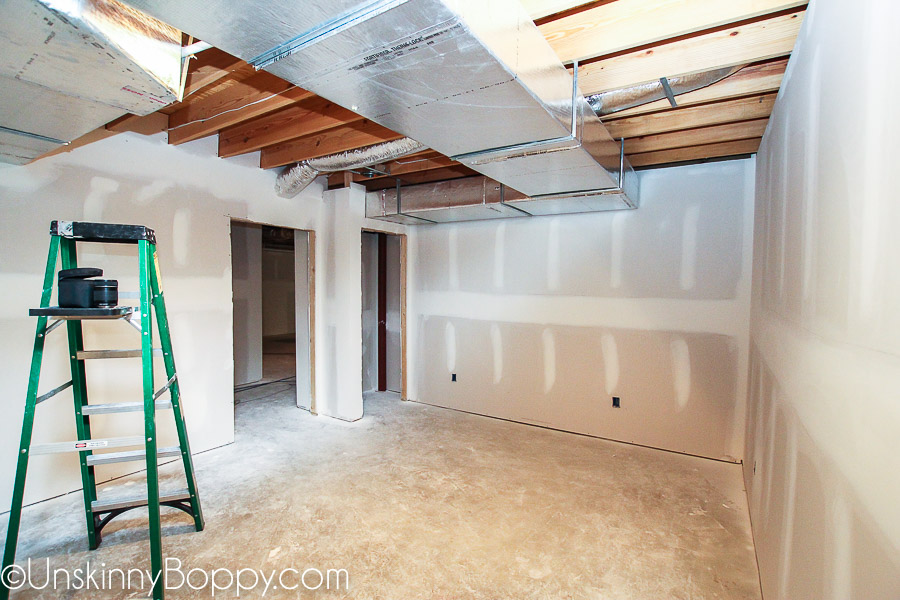
Just like in the previous basement, the J and his dad did all the framing and we hired out the rest of the work to subcontractors (sheetrock/paint/electrical/flooring). We saved so much money doing it this way versus working with a contractor. Semi-DIY is the way to go, IMO. We have access to a lot of really excellent subcontractors, though, so that helps.
When it was all said and done, we only had two exposed beams to cover up in the center of the large room. We were able to take it from this…
To this!
How awesome is that?
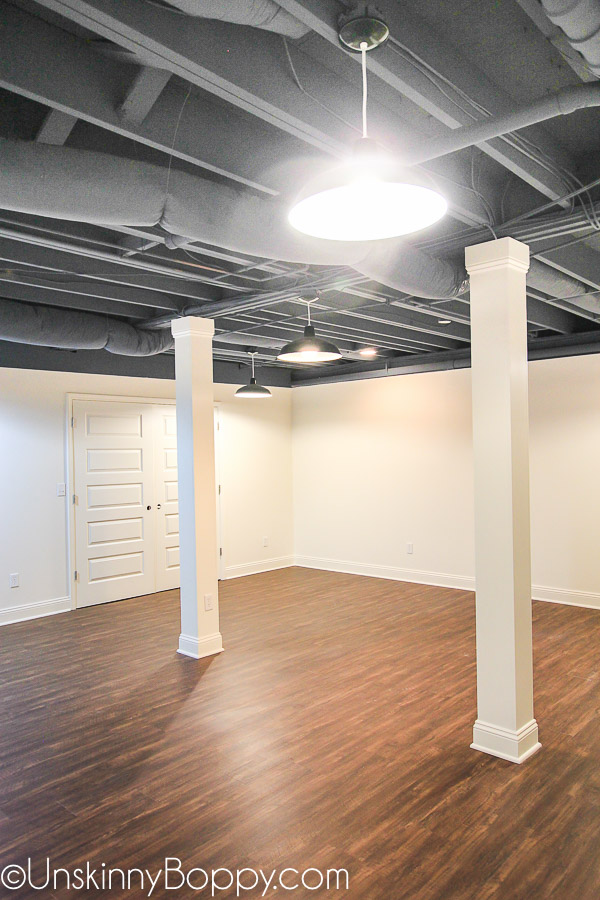
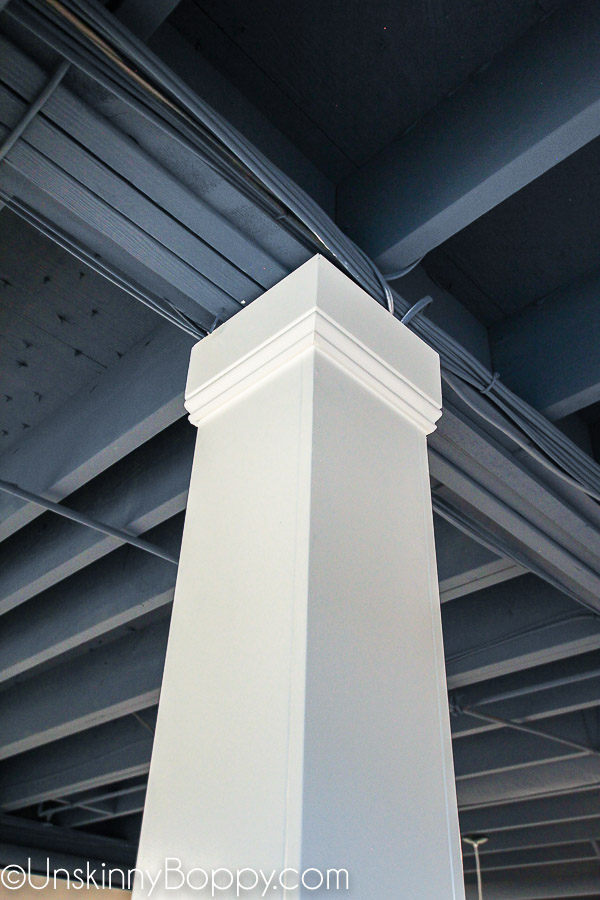
The other posts are hidden inside the closets. Out of sight, out of mind. We didn’t box these in- they just got sprayed the same white color as the walls.

The two columns got trimmed out with 6″ Speedbase around the bottom and the top. It’s a simple but elegant way to finish off a sheetrock column.
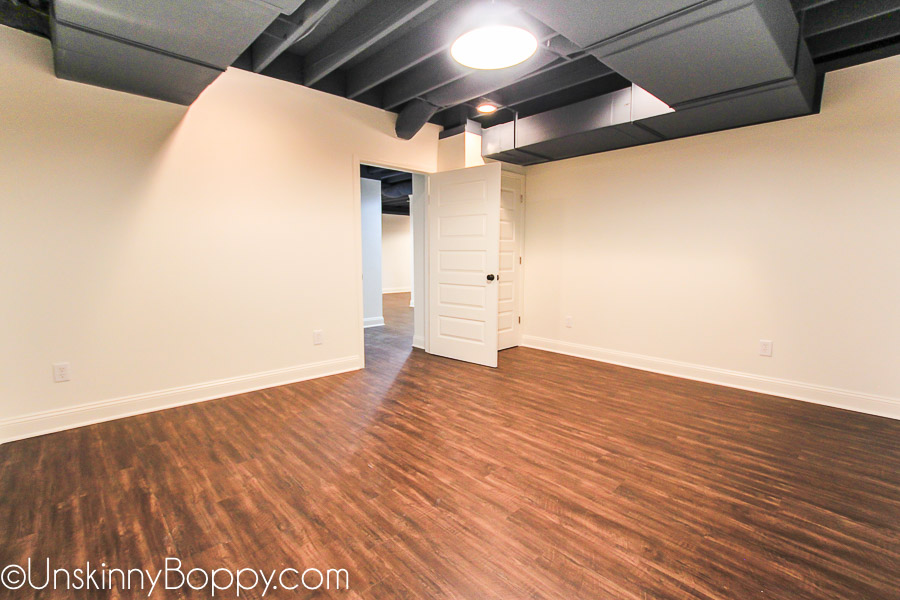
Here is the office area we created right when you walk down the steps from upstairs.
And here it is finished!
The water heater and air handler right against the staircase, so we needed to have easy access to those.
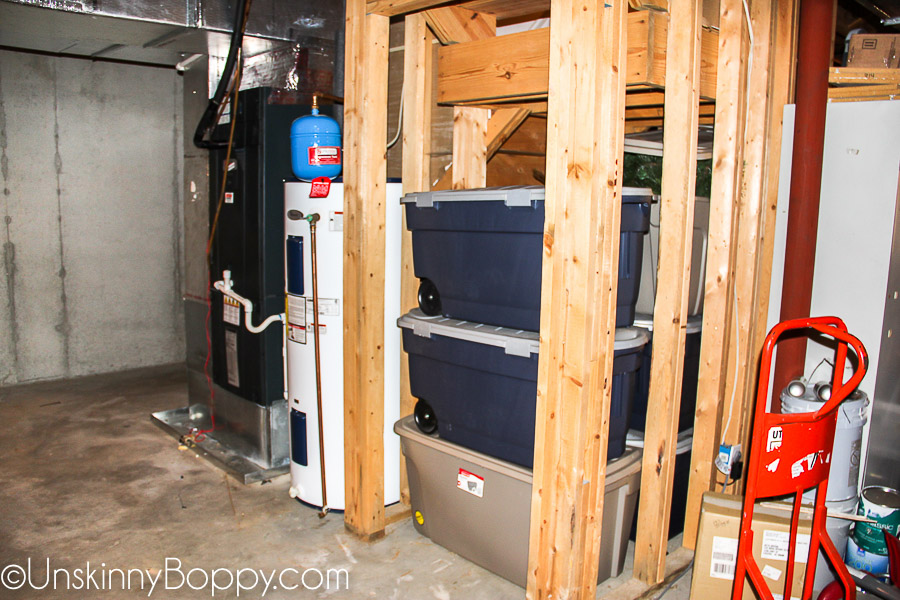
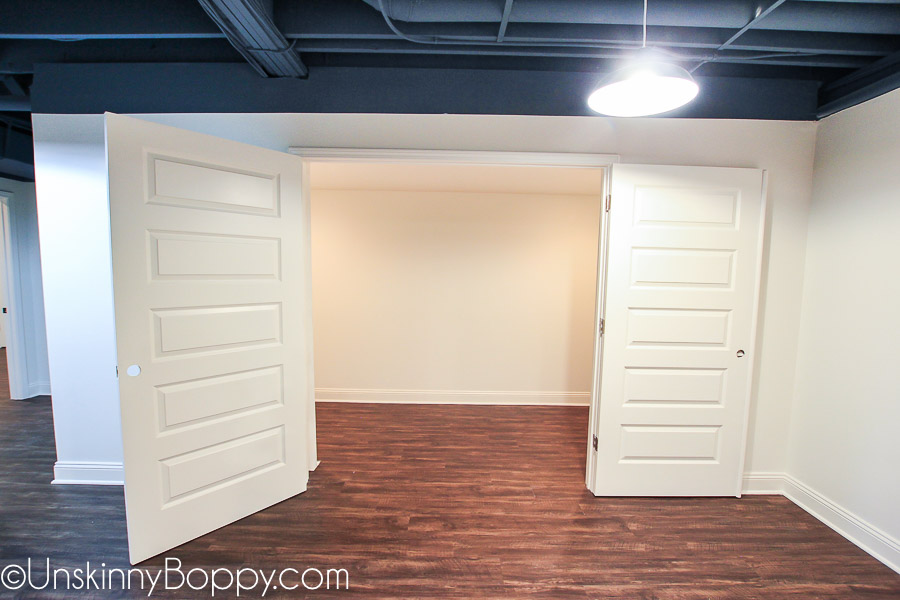
To take care of that, J and his dad built out a big storage closet with two 3 foot wide doors that provide a 6 foot opening for easy access.
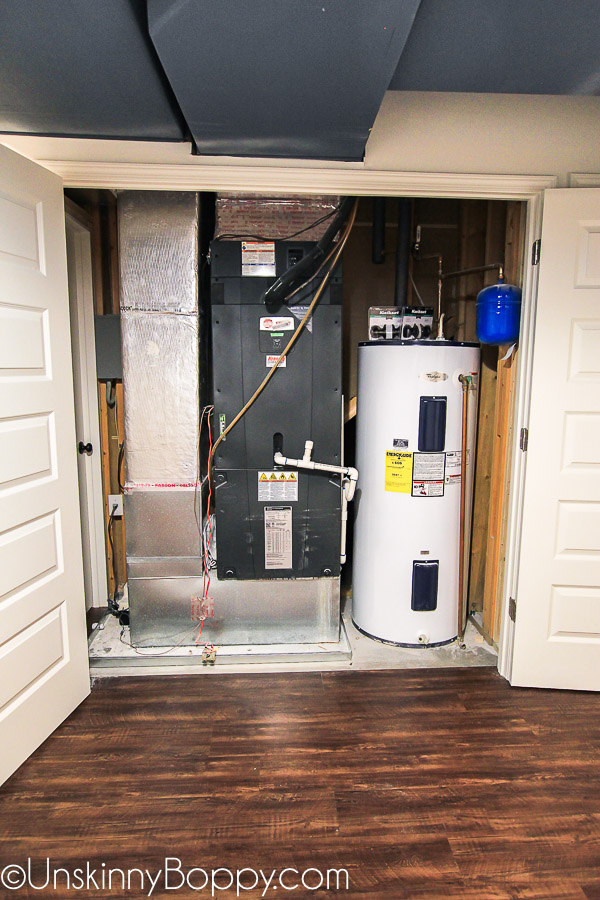
And here is that area with the doors closed- the door on the right leads to the storage area under the stairs, which makes an excellent storm shelter during tornado season.
Here’s another before shot of that area that leads to the stairwell.
And here is the finished area.
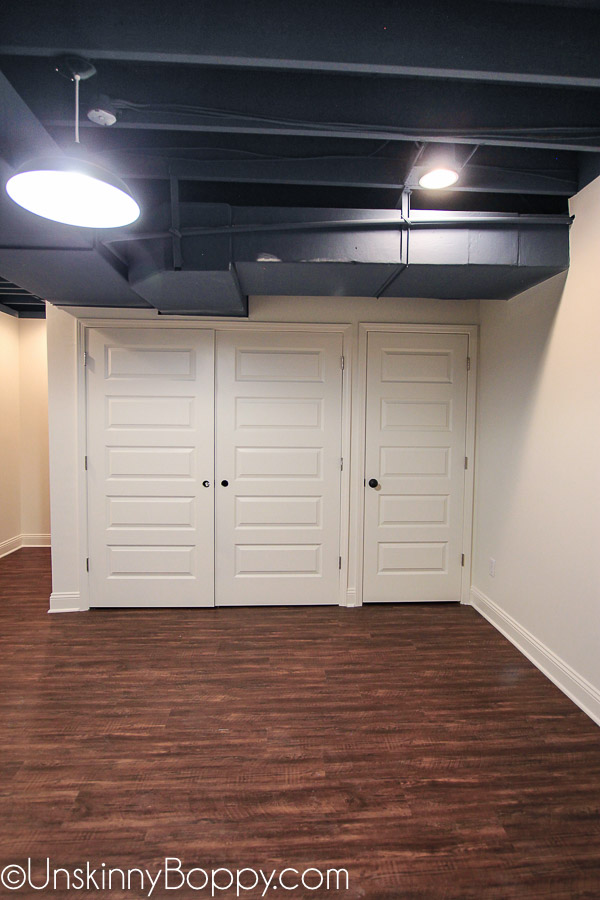
Back out in the big room we added a MASSIVE storage closet
This area will hold all my Christmas decorations, including the tree. In fact, we don’t even have to take the tree apart anymore. It can just slide right into this closet full erect and still have plenty of room for other stuff! It’s great!
This door leads out to the unfinished parking area of the garage and J’s woodshop.
I’m SO pleased with how the color scheme turned out. It’s neutral and manly but not too man-cavish. The wood floors are the exact same ones we used up in my attic office. They are a cork-backed vinyl that snap together really easily. They are completely moisture resistant so perfect for a basement floor. 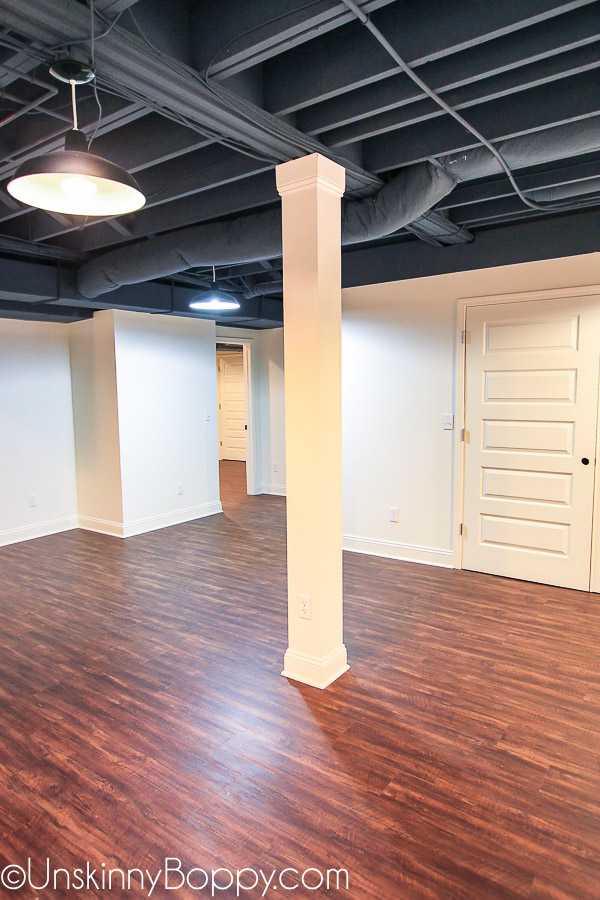
J bought these industrial pendant lights for really cheap from Amazon. They are actually a hunter green color but you cannot even tell with that dark blue ceiling. They just blend right in.

So there you go!
The Great Basement Remodel is almost complete. We still need a few little things like doorknobs and door stops, but it’s already being used by the family.
RECREATE THIS ROOM
If you are interested in finishing out your attic space and want all the details of how we created this room, here ya go! (contains affiliate links)
- Wall Paint: Sherwin Williams Superpaint in Westhighland White (Satin finish)
- Ceiling Paint: Sherwin Williams ProMar 400 in Smoky Blue (Flat finish)
- Flooring: Coretec 7″ wide Kingswood Oak from Carpet Express
- Base trim: 4″ white Colonial style baseboard
- Doors: Jeld-Wen Smooth 5-panel interior prehung doors (various sizes)
- Door handles: Kwikset Cove door knobs in Venetian Bronzes
- Pendant lights: Sea Gull one-light pendant, green finish
- White switches and electrical outlet covers
Don’t forget to pin the basement before and after pictures to your favorite Pinterest board! 🙂
Like this post? Come see how we decorated the office area here:


How did you hide your insulation where the wall met the ceiling?
It’s just tucked down in the wall far enough to be hidden from sight at eye level. Nothing special. 🙂
Sooo I love your concept and I’m not going to be original and copy your color scheme. Did you have any issues with bleeding through on the joists? I was quoted four days of work for spraying my ceiling and $2400. 15 gallons of paint. I’m getting another quote, but I figured after reading your post that I wouldn’t break $1000
15 gallons included priming as well. Did your sprayer prime the ducts or did Sherwin Williams paint adhere easily?
beautiful job! I am about to do something similar our my basement. Was wondering why you selected a flat paint vs gloss paint for the ceiling. I thought gloss might be easier to dust. Would like to know your thoughts. Thanks!
Flat is less reflective so you see less of the nails/ugly stuff sticking down from the floor above. It all just kind of fades away with the flat, where a gloss paint would show every flaw. Hope that helps!
Love this! I’m in the middle of remodeling to expose a ceiling and I’m wondering- did you paint the silver insulation that covers the HVAC ductwork? If so it looks awesome! Curious if it’s possible to cover the silver insulation by painting. Any tips would be appreciated!
Yes, the painter sprayed everything on the ceiling including the flex duct. It’s holding up just fine.
HI! I had a question about recessed lighting – what type did you use? I’m loving your post and interested in using both hanging and recessed. thank you!
Hey Natalie, Our electrician actually provided the recessed lights so I cannot specify what type they were- just regular builder grade can lights, if I had to guess. 🙂 Nothing too special.
I am currently using your basement as my inspiration for finishing ours. Our “before” looks very similar to yours. My contractor thinks we should sheetrock the ceiling and box out ALLLL of the ductwork. He said he is afraid the ceiling paint won’t last and it will flake if kids touch it. He said he is mostly worried about the “soft silver” ductwork. How has yours held up? PS if we sheetrock it, its an additional 3k in just labor.
Hey Stephanie!
In December we will be at the 2-year mark of the basement remodel and the ceilings still look exactly like they did in the blog post. 🙂 The paint is holding up perfectly, even on the flex ductwork. Nobody is touching it, though, especially not the kids, since they cannot reach it! I don’t dust it, so that might be saving it from flaking off, too. LOL 🙂 I would spray it all again in a heartbeat to save that amount of money. Good luck with your remodel!
Rather than purchasing a disk sander, i simply built one using a motor and additionally scrap hardwood.
This is amazing and so helpful as my husband and I have the same exact layout and pain points in our unfinished basement. Thank you for sharing!!!
Thanks so much! Good luck with your remodel.
This looks great! Congrats on some ingenious thinking!
A question for you—have you found problems with spiderwebs/dust in the ceiling? Cleaning spiderwebs from the corners of a drywalled/dropped ceiling basement is not my favorite job, I wonder how this compares (for a house we are looking at purchasing that has very low basement ceiling height)? Thanks for any experience you are willing to share!
Hey there- so far the basement looks exactly as it did in these pics (almost 2 years in). We have a regular bug man who sprays quarterly so we don’t have a problem with spider webs. I have not dusted up there at all because 1. I’m lazy and 2. it still looks fine. 🙂 Good luck to you!
Sweet. I definitely want to try this.
It looks great. I’m wondering how you handled the seams where the drywall met things like the air ducts and also along the top of the walls at the ceiling to get a clean edge? I’ve been struggling with ‘planning’ and half starting my basement for years and this is the kind of happy medium solution I’ve been looking for to clean up the space and make it friendly.
Hi Brian,
When they hung the sheetrock he cut the top as straight as possible but otherwise it is completely raw and unfinished. The paint sprayer covered up all the rough edges and you don’t even notice that it’s not finished. 🙂
So excited to see your finished basement! We are redoing our basement in our new old home. It was new in 1985….complete with dropped ceiling, bird wallpaper, brass fireplace cover, and wagon wheel light fixture. We really want to paint our ceiling and do away with the low suspension. One son is 6’4” and the other is 6’2”. We live in the Central Alabama area, and I’d love to find out more about your painter. If you’re not okay posting his information publicly, just PM me, please. Your basement is lovely! Thanks for sharing!
MommaBrick3
When painting the ceiling does that include all the wires & everything? We are considering doing this to our basement due to low ceilings but I did not know about all the wires if the paint would crack & chip off easily. Your basement is beautiful.
Hey Jolene, Yes, everything got sprayed in the ceiling except for inside the light fixtures. They stuffed them with paper towels and taped over them to keep the paint out (power was turned off of course) but otherwise it was sprayed 100%! 🙂
I live in Birmingham and wanted to see if I can get Francisco’s number. Love your basement! GORGEOUS!!! We are going to start working on our unfinished basement. Yours is SO inspiring!
Thanks so much! -Sara
Wonderful results! Can you please tell me what color the trim is, I couldn’t find that info. Thanks!
Thanks Kathy! The blue paint is Sherwin Williams ProMar 400 in Smoky Blue (Flat finish). The wall color is SW Westhighland White and the trim is also Westhighland White in a semi-gloss.
We love how you’ve refinished your basement. Ours is very similar to your before pictures and we are using this as inspiration for our remodel. What did you do to your duck work? Is it painted, if so, what type of paint did you use? Thank you!!
Thanks Andy, yes the ductwork is all painted with the same paint as the rest of the room. So far it has held up really well and hasn’t flaked or chipped. The paint we used is Sherwin Williams ProMar 400 in Smoky Blue (Flat finish)
I am having a dilemma… I too am going to be painting my ceiling and finishing the walls and floor. Only question i have is what do you do up between the joists between rooms/outside walls? I have a bedroom off of the main area and it has all the gaps above the walls. What are thoughts on closing that off.
The sheetrock guys cut the drywall as close to the ceiling as possible so that there wouldn’t be much space between different rooms. Once the ceiling is all painted a dark color you don’t notice the gaps that much. We did have rolls of insulation put between the walls of the finished/ unfinished areas, but the sheetrock guys did a great job of hiding all of that really well. And dark paint covers a multitude of sins. 🙂
This basement remodel is absolutely perfect and almost exactly what we are wanting to do in our new home!! One question I do have is: what did you guys do as far as HVAC? Is the basement ventilated/heated? We have an attic unit, so we would be purchasing an entire new unit if we went that direction. Our main concern with needing one is heat/cool for moisture control.
Again, this is absolutely fantastic. We will definitely be using your tips on ours!! The office is just fantastic.
Thanks so much Bayley! I appreciate your compliments. We do not have any HVAC in the basement at all. It’s completely underground so it stays a consistent temp all year round (about 68 or so) We have an electric fireplace for the winter cold but nothing to cool it down since it doesn’t need it. Hope this helps. 🙂
The basement looks awesome. Thanks. You did a great job.
We are debating painting our basement at the moment. We are thinking of a darker gray tone. Does dust or other dirt/debris stick to the paint since you did a flat finish?
Looks like you have nails that stick out, as do we from the hardwood floors on the 1st floor. Did you do anything special to them so they would not rust after painting?
No, we haven’t touched them at all after they were painted. No rust that I’ve seen. Rusty nails would mean a serious moisture issue and thankfully we don’t have that.
Wow! Very nice. I am renovating my house, it is an old house constructed when my grandfather was alive. Well now I am decorating the old home to make it new from inside and outside also. I have started from the basement. The idea of painting the ceiling is very nice, but before that I have to do the basement waterproofing by hiring the basement concrete contractors . After the completion of waterproofing I will start implementing your idea. Thanks for sharing.
Your basement is EXACTLY what I am looking to do with mine, and I love the colors. Can you tell me how you installed the pendant lights? Were they hardwired directly to the light box? I am not sure what to do with the bare bulbs? Been looking for some type of bulb shade, bulb cover, etc. I like the pendant lights but just not sure how they would be installed.
Thanks and love your website!
Thanks so much for your compliments, Anita! The pendants were hardwired by our electrician. He had to add the boxes for them, so I drew out a sketch to show him where I wanted them so they were spaced out around the room equally. I don’t touch electrical stuff, so that was a hired job for sure.
What program did you use to create your floor plan?
AutoCAD
This is pretty mush exactly what I want in my basement! Did you have to prepare the ceiling at all though? Our contractor was saying it may look weird just sprayed, the mastic on the ducts for example is not smooth. He recommended a insulation board or covering the whole duct in mastic. Did you do any of that or just spray? It doesn’t look textured?
Also he was concerned about fitting lights in between the ducts. I love everything you choose!
We didn’t prepare the ceiling at all- just painted it with flat paint. 🙂
your basement looks wonderful. I’m in the process of remodeling mine. I’m am 6’2 as well and my wife and I are thinking of the open ceiling concept. However, our only concern is how do you clean and keep it clean from dust, etc.
Its seems with all that open ceiling, slot of dust, etc will build up and would be difficult to clean as well as time consuming.
Hey Ted, We are a few years into this basement remodel now and it still looks as good as it does in these pics. I don’t notice any dust building up anywhere so I would encourage you to go for it.
My husband found this post and showed it to me and I loved it! We went with a bluish graphite color for our basement ceiling, too! It came out really awesome – thanks for posting!
I was searching for ” basement renovation contractors” to know some insights about and found your site. Your working style is unique and complete work is also attractive. I learned a lot, now i’m a bit clear. I’ve bookmark your site at my end. Keep us updated with new topics. Visit: basement renovation contractors
Hi, to pass inspection did the electrical wires on the ceiling need to be in conduit. We are in the process of finishing our basement and I love the painted ceiling idea! Thanks
You’ll need to check with your local codes on that one Sonja.:) Thanks!
I love this project, the basement looks great! Did you have any inspection issues with leaving the exposed wires painted vs using conduit tubing?
Your basement looks great! What color did you paint the doors? Are they the same color as the wall or the trim???
This looks amazing, thank you for posting! We are having the same problem, low ceiling/lots of pipes. How has the paint held up on the copper pipes?
I am truly inspired by what you’ve done here. I recently bought a home built in the 1930s and the basement has these exact issues!! After seeing what you’ve done we will be doing the same. I wondered if you wrapped the shiny silver duct work in fabric or is it just painted the matte blue? I’m worried the shiny aluminum like texture won’t paint well.
I recently moved in with my partner. A new house we bought together. We had to plan and set up everything in a very short time. Finding the right appliances for the kitchen, setting up the bedroom, the outdoor and the garage. The toughest was the living room. Thank you for sharing the it. Articles and ideas like yours had really helped us get done with things conveniently. There is still a lot for us to do. Bit by bit we are getting there:)
Excellent job. I don’t think I would have minded the columns being exposed-maybe just painted them or something. Were there any windows in your basement? Was it already water proofed before you started this project?
Hi Beth, I realize this post is a couple of years old but just in case you still live in that house…we are working on finishing a garage in Austin TX that’s very similar to your basement. We have super low ceilings so plan to keep the ceiling unfinished covered only with painted spray foam (that they will roll so it looks smooth), but drywall the walls (after insulating).
My question for you is how does the drywall meet with the ceiling? It is just raw drawall that stops at the ceiling? did you do anything to “finish off” the drywall? Do you worry about dust or anything getting in the gap (if there is one?)
Thanks in advance!
Hi! I sent your awesome comment to my husband who did all the work and here is his response. 🙂 Hope this helps you!
We did not seal the basement floors. We did not have any significant moisture coming through the floor so our flooring was good to be laid directly to concrete. It is a floating flooring not glued. I would not seal the floors if you are going to glue flooring.
Do not redirect any air ducts without consulting an hvac professional first. I did. They stated that we would need a whole new system for the basement as our current setup was not made to take on the additional square footage of heating/cooling the basement. In our location the basement temperature does not fluctuate much from 61 in the winter to 66 in the summer. I did not see a need to purchase a new system or take away from the main level by redirecting the air to the basement. I purchased an electric faux fireplace heater to take away the chill in the winter. I find the basement to be comfortable with any hvac. The kids have had school down there all year and it’s been fine.
I did nail into the concrete through the treated foot plate boards using a ram set. You need blank .22 rifle shells and special nails. All can be found at a hardware store. Here is a link to the one we used: https://amzn.to/3mGr2vq. It sounds scary but it’s the quickest and easiest way to nail into concrete. Use ear protection for this! You could also use concrete screws and a hammer drill but we already had the ram set equipment from the last basement remodel.
Looks great!! We ripped out our dropped ceiling and sprayed years ago! We love it! Doing so more updates including a new floor in basement and I love yours! How is it holding up? Wear? Any cleaning issues??
Thanks! It is still holding up great after all these years. Good luck with your renovation.
I love your basement. Can you tell me which basement design app you used?
I love your basement. What design app did you use?
I wish I had seen your post before we finished our basement! We did very similar finishes, but I chose to paint our ceiling (Behr) starless night and could not find an exposed ceiling basement with that color to show my husband. Thankfully he just trusted me and it turned out amazing!! Your basement looks awesome!
I really love the spray paint basement ceiling my walls are white beick but upper ceiling look like yours. what a beautiful outcome have to try it .did you have someone measure for the columns for polls?
I see you spray painted your flexible ductwork. I have what I call “plastic covered flexible ductwork” in the ceiling of my laundry room. I would like to paint it but I am worried it would flake off. Has your painted flexible ductwork resisted any flaking?