When I first purchased Lightroom I had a hard time using the program because it just wasn’t very intuitive for me, but after I took a Lightroom class I now use Lightroom for editing every single blog photo that I post. I love using it for editing my interior photos because I can turn a dark, dreary picture into something magazine worthy. I could go on and on about the benefits of using Lightroom over Photoshop, but I don’t want this to become an essay. Let’s just say that I started out using Photoshop for edits, and now I use Lightroom almost exclusively. Once I understood how to use it (and my photos improved to the point that I didn’t need a huge amount of editing to make them decent) I never looked back.
I had a reader ask about my camera settings that I used for the pictures of my sunroom in the sweater lampshade tutorial. Here are the settings that I shared for the photo:
1/100
ƒ/2.8
ISO 800
These were taken with my Canon 60D and Tamron 28-75 mm lens.
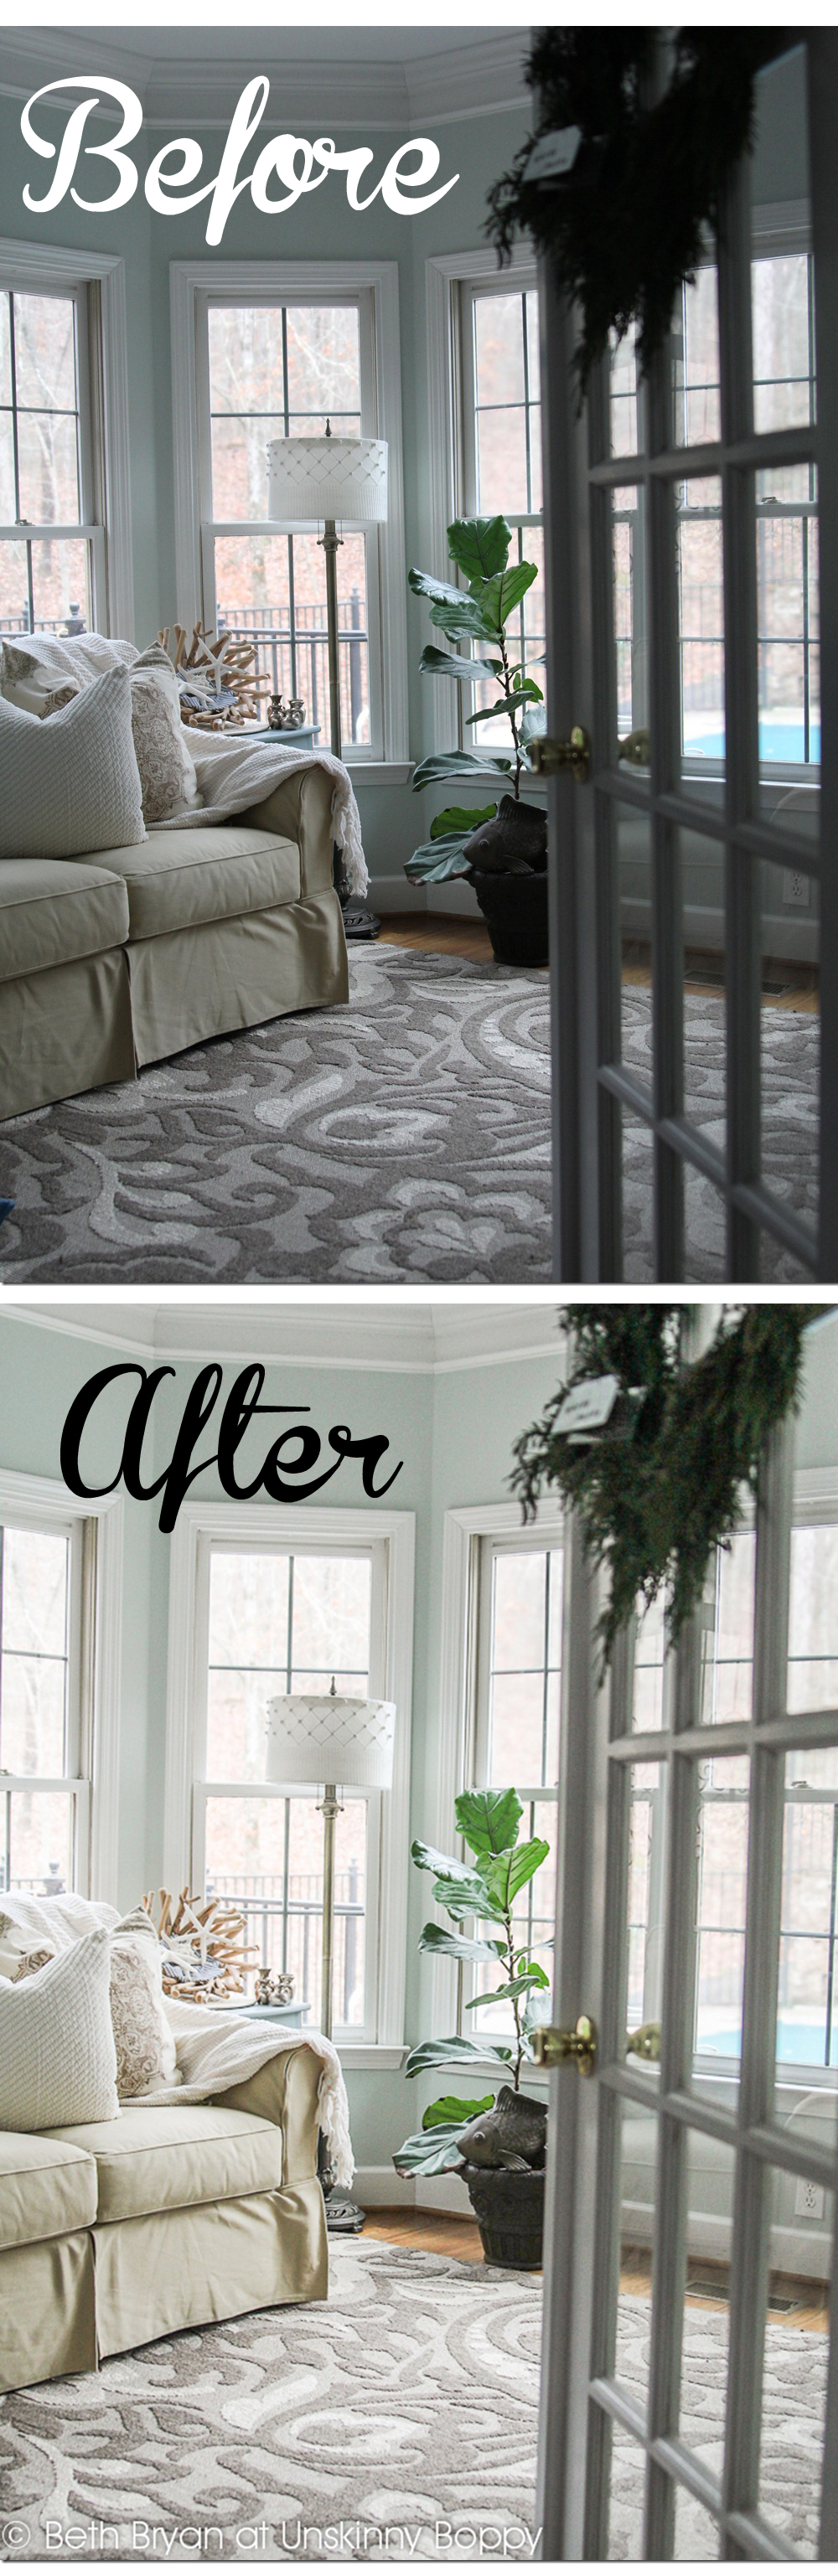
But I immediately realized that these settings were misleading, because most of the “prettiness” of my photos comes from editing. As an example, here is the photo straight out of the camera (SOOC) before any editing:

Editing is as much of an artform as photography, in my opinion. You need a light touch, because over-edited photos look too fake for most people to appreciate them. Lightroom makes editing so incredibly easy, and it’s non-destructive, so you never have to worry about flattening an image and accidentally saving over the original.
Once I got my images imported, I chose this photo as the one to base all other photo edits from. When I have a batch of photos for a blog post, I choose one to edit first, then I create a preset of those edits and with the click of a button I can edit the rest of the pictures in that batch with the exact same settings, which is the biggest timesaver EVER.
Now for the edits! I don’t intend for this to be a full start-to-finish tutorial on how to use LR, since that would make for an extremely long post. If you are familiar with the basics of it, though, here are the steps I took to edit this picture.

What does all that mean, you ask?
I’ll try my best to explain my thought process above in plain English.
I began by lightening the picture. Since I prefer all my house pictures to be on the high-key side, this pic was way too shadowy and dark for my tastes so I bumped up the shadows +41.
I felt the SOOC shot looked too “cold” so I adjusted the temperature +5 to be a bit warmer. This is what made the beige sofa and the driftwood bowl pop out and look warmer. It’s a tiny adjustment so they don’t look dirty. Just warmer. You can make whites look whiter with this tool, usually by decreasing the temp.
Clarity is something I adjust on every photo. It sharpens the image and makes edges of things look crisp and clean. +14 for Clarity on this picture.
Because I had adjusted the shadows up so high, the windows were blown out (white) so I decreased the highlights by –10 to help eliminate some of the “an alien spaceship is blasting off right outside my window” effect.
Exposure got boosted by +0.13 to brighten up the photo overall.
When I raised the exposure the windows were too blown out again, so I took the highlights back down to –24 to balance some of that out.
Clarity gets boosted again one more notch to +15 from +14. A +1 boost is not significant, but like I said it’s my go-to edit so I find myself seeing how much I can get away with.
Boost the contrast +17. This is another one of my go-to edits because it makes things “POP” in the picture. Colors get more saturated and stand out better.
I sharpened the image to give it even further clarity. +20 on the sharpness with a .1 sharpness radius.
Luminance Smoothing reduces noise in the photo. If you find that a lot of your photos are grainy, this tool is your BFF. You can also try lowering your ISO on your camera settings to reduce noise from the original photo, but this works well, too. Removing the “noise” or grain in a photo gives everything a nice smooth, ethereal effect. Use this tool with a light hand. You want to reduce the grain, not make the room look like it’s covered in a white haze. There is still a bit of grain in my final edited picture, but it’s not that noticeable and I didn’t want to blur anything too much.
Finally, I straightened out the picture.

See how everything leans to the left in the original? I knew that the picture needed to be straightened, so I used the crop overlay tool and adjusted the slider on the angle until it was a bit straighter. When straightening interior room photos, I pick the furthest back corner wall as my angle perspective and get that corner straightened to as close to 90 degrees straight up and down as I can. If you notice in the “After” I actually went a little too far to the right, but that’s ok. It doesn’t have to be perfect. You use this same concept when drawing perspectives in Interior Design, because this is the way your eye sees a room. Don’t use the foreground to straighten, always use a long, straight corner in the background as your guide. This LR straightening tool saves me so much time and frustration because I don’t worry about getting my photos 100% straight on the tripod when I’m shooting. I know I can edit this later if it’s crooked. When you straighten an image in LR it automatically crops out the edges of the picture that are not fitting inside the photo frame, so you never have to worry about getting any grey backgrounds included in your pictures like Photoshop sometime does.
I added all of these steps as a preset (titled “light) and used that preset for all of the sunroom photo edits in that post. Just one click and all those changes (minus any cropping) were automatically added to every shot after that. This is my favorite TIME/LIFE SAVER!! Another excellent timesaver in Lightroom is the batch export tool where you can select photos in a big batch and export them all at once with the same settings (pixel size, name, watermark, etc). I will get to that in another post, though! My blogging life has gotten SO much easier since using Lightroom. I cannot recommend it enough.
So, there you go! Here is the amazing result of all of those steps:

I hope you’ll try out a free trial of Lightroom and let me know what you think. Once you understand that “Import” is the same as “open” and “Export is the same as “save”, it’s really not too hard to use! Have fun editing!
Beth

Dear Beth,
Thank you for the tutorial. Could you tell me where you got the lovely rug in the picture? I love it . Thanks for the great website.
Thanks so much! It’s made by Mohawk – here is a post I wrote about it for them. I bought it at Home Depot. http://mohawkhomescapes.com/finding-rug-love-when-you-least-expect-it/
Thank you so much for the tutorial. I got a new camera and PS, so I’m going to do some playing around with it.
Great news, Angela! Lightroom is different than Photoshop, so these instructions won’t help you in Photoshop. They are two very different animals. 🙂
Thanks for the great tutorial! Your photos are great!
Debbie
I always love looking at your photos! They have such a nice glow to them, and you do a great job at editing! I haven’t tried lightroom, but it looks almost identical to the editing tool in Iphoto on my Mac. Thanks for the great mini lesson!
Thanks so much Beth! I am still trying to figure out Photoshop, however, Lightroom is very intriguing to me. Your pictures are always so beautiful.
WOW – great tips! I might need to look into Lightroom. Still love that sweater lamp 🙂
Here is the class I took: http://clickworkshops.com
You’re too smart! I need to dig into Photoshop and learn a thing or two… it’s been calling.
This is fantastic! Thanks for all the explanation, editing makes such a difference.
I actually didn’t know a lot about Lightroom and I am shopping around for a photo editing software. I might try it out.
Glad I inspired a post 🙂
Beth, thanks for the hot tip! I’ve been going back and forth between Pickmonkey and Photoscape, and then occasionally pop into Photoshop….I just can’t find something I love. But this looks like it might be exactly what I’ve been looking for. Going to check it out now. SO glad you shared! xo ~V
Wow, what an amazing job you did! I’ve been thinking that this year I need to focus more on my photos for the blog, and I’m thinking about buying editing software of some sort, so the tutorial is super helpful!
What a difference editing makes!! And someone who knows a bit about it :). Still can’t get over how gorgeous that room is!! Pinning!
Umm.. WOW. just wow- amazing what buttons and saving can do! Some tweaking here and there…great stuff Beth!
Now that is talent! I LOVE the before and after shot..I need to try out lightroom :o0
I still get stumped with the whole picture thing but I am trying. The hardest is my dark living room. I got a new tripod just have to use it!lol This was helpful thanks.
I love lightroom, Great tips girl- pinning this for the future!
Seriously Beth–what a great tutorial. I’ve been thinking about taking the plunge to lightroom and this tutorial helps me reassure that I’m going to make the right move!
Beth!!!
Thank you so much for sharing this! I love that you shared the numbers….it makes everything so much easier! You always write the BEST tutorials!
Have a great day rock star!
karianne
This post has been so helpful. I purchased photoshop a year ago and still haven’t registered it because I’ve been dreading the high learning curve involved. I recently migrated to a Mac, but have been reading terrible reviews about their most recent photo editing software. I was getting a little panicky about what to do when along came this post via Pinterest. I’ve heard other good things about Lightroom as well, and since I understood everything you explained here fairly easily, it think it sounds like the right program for me. Your tutorial rocks, and I look forward to more. I’m going to scoot over to your links and download the trial, then take the class. Thanks so much!
Wow Beth! Great tutorial I will have to try this!!
I couldn’t live without lightroom. I got mine for Christmas in 2011 and I love all of the options it has. I could spend hours editing photos and not get bored with it. If you haven’t tried removing all colors except one and making a photo look like a work or art, you should try it. It’ll make you feel like a pro! ~ Angie
So true about the import/export. LOL! Great info.
Tiffany
THANK YOU!! This is the most simply and succinctly written description of basic Lightroom editing that I’ve ever come across. I can’t wait to try some of your tips!
That is amazing. And look easy enough, even for me!
Great edit! I’m curious as to what your wall colour is? I love it!
Great post Beth! I have a question, I am using photoshop elements 10 (learning it) and am starting to shoot in RAW and elements lets me edit the raw data (similar to what you showed above) . Do you know the differences between the two programs where you would suggest to invest in light room? I am new at PS elements and shooting in Raw so I’m not really sure if I should also get light room. Do you know?
Hey, your home is beautiful no matter what you choose to do, lightroom or not. I am assuming the first was a little under exposed or that you simply didn;t have much light, So lightroom only helped give a true example of the true colors etc. Your decorating is lovely !
[…] Unskinny Bop offers a very thourough tutorial on how to edit interior photos. This is something that I often […]
Thanks for this post! I found it on Pinterest (and my husband says its a waste of time- humph!) I am a real estate photographer fora team and have been posting the same ho-hum pics for years- cant wait to make my photos pop and really stand out from the competition with your tips 🙂
Hi Amiee,
I see that you’re a real estate photographer. I suggest that you take a look at the web site http://www.photographyforrealestate.com. It’s a fabulous site and they have a group on flickr that’s incredible. Top real estate photographers from all over the world are on this site. It’s loaded with great tips for interior and exterior photography. I also shoot real estate photos and this web site and the flickr group were a huge help. I can’t tell you how much my photography improved with the help of these two sites.
[…] To read more about how to edit interior room photographs with Lightroom, click here. […]
I am a natural light photographer and use just my Mac program to edit, but I am wanting to invest in an editing program. Which would you suggest to buy that is reasonable priced but can do the trick. I feel that my photography is lacking due to not having the editing the high dollar photoghers use. You have a great site, thank you and God Bless.
[…] Late winter is my most slothful time of year, so February, March and April resulted in exactly ZERO DIY projects, but I did give you some great tips on how to quickly edit your interior photos with Lightroom. […]
This tutorial was extremely informative and easy to understand. Thanks so much for posting!
[…] 13. Once all photo edits are complete, Ctrl-A to select all photos in thumbnail gallery. For more info on how to edit interior photos, check this post. […]
Great LR tips!! I love, love, love LR too! I find that always shooting interiors RAW and with the iso almost always at 100 keeps noise out and helps also in post-editing for cleaner images. I only use f/2.8 or lower if I want a blurred background and usually shoot a wider angle at least f/11 or higher. I also use the lens correct for straightening out curves the lens will naturally see makes a big difference. I love that your windows aren’t blown out. I struggle with that and have only really conquered it with blending more than one exposure, but can’t do that in LR, plus it’s a lot of work. I found using the sharpening tool, then luminance, then holding down the option key and using masking would let me sharpen only what I wanted sharp and really gives depth. Great tips…and do you like the 6oD??
[…] How to Lighten and Brighten Interior Photos in Lightroom […]
[…] Go to Unskinny Boppy to see a tutorial on how to use Lightroom here. […]
Unquestionably believe that which you said.
Your favorite justification appeared to be on the net the easiest thing to be aware of.
I say to you, I definitely get irked while people consider worries that
they just do not know about. You managed to hit the nail upon the
top and also defined out the whole thing without having side-effects ,
people can take a signal. Will likely be back to get more.
Thanks
Would love to subscribe to your posts…
Hey Cathy! I would love to have you subscribe! Sign up right here: https://bethbryan.com/get-posts-via-email/
What is the paint color on the walls in this room (sunroom)? Beautiful
Holy smoke Beth, i gotta say your “how to…” completely inspired me to buy Lightroom, i was a little bit hesitant but now i`m completely in love with it, thank you so much!!
This is so useful! I’m new to Lightroom and have managed to figure out the basics as I’ve used Photoshop for years, but this is really helpful.
Erin | Being Erin
[…] honest I found out about this program while browsing through pinterest. I gratefully stumbled onto Unskinny Boppy’s blog to then which I was introduced to the realm of this program. From there I began to manuvere it by […]
It is amazing how photograph can be changed from simple tools. It keeps the original quality but increase the beauty.All I can say is the power of real estate photo retouching or photo editing.
Thank you for shedding light on how to use Lightroom. I’m an aspiring photographer, designer, and wannabe blogger in my “spare” time. I just began using Pinterest and Facebook to help market a cabin rental my hubby and I renovated. I just installed Lightroom and it is mystifying to me.
Jami Risley
Good response in return of this issue with
real arguments and describing everything on the topic of that.
Nice Article to edit real estate interior. We would love to share with our photo editors