Looking for more tips on how to use Adobe Lightroom for editing photos? I’m sharing my photography editing workflow from start to finish. Learn how to batch edit your images in just a few quick clicks! Your time spent editing photos will be measured in minutes instead of hours. For real.
{Quick note: This was written in 2014. Lightroom has made recent updates so the newest version will look different in some places. Most of this still applies, though!}

Beth’s Quick Photo Editing Workflow Tips:
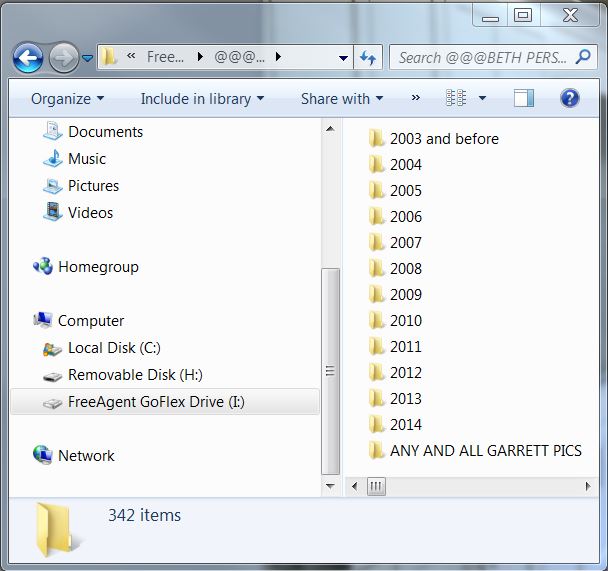
1. Copy and save all your photos from your camera card into folders on your computer or external hard drive. Don’t try to import from your big pool of photos from your camera card or you will not be able to find all your images, then you will get frustrated and quit. Take the time to do this step FIRST, and it will save you a lot of grief later. I like to organize my picture files by year, then by blog topics within that year so I can go back and search later if I need to find them quickly. You probably already have a system that works for you. Use it. If you don’t, get one.
2. Open Lightroom, and click File—> New Catalog and create a new catalog for this project. Be sure to save the new catalog file in folder with original photos. (Lightroom will close briefly and re-open. Don’t freak out. )
3. In Library Mode, click “Import” on bottom left of screen (or use keyboard shortcut Ctrl + Shift + I). The main thing to remember about Lightroom is it offers non-destructive editing. Because you are not actually opening and saving your photos, you are not destroying the originals! BUT! That also means you will not find an “Open” or “Save” button anywhere in Lightroom. This is tricky for some people and stops them before they ever get started with Lightroom. To get over that hurdle, think of Import as “Open” and Export as “Save” in Lightroom.

4. After you click Import, select the source where you saved your original photos. You can expand the files by clicking the arrow beside each one, then choose the folder where photos are saved (this is why file organization is so important.)

5. Check all the photos you wish to edit. (Either “Check All” or “Uncheck All” then Shift-Click or Ctrl-click to quickly highlight thumbnails. Click in one of the highlighted checkmark boxes to select all highlighted photos as a batch.)
6. Click “Import” on bottom right.

7. Switch to the Develop Mode on top toolbar

8. Use the right arrow keys to toggle between photos, culling out the best images by using a rating system. (Click 1-5 for star ratings, 0 to remove all stars)
9. Click “Filter Rated” to see only the rated images and remove the culled ones from thumbnail gallery

10. Edit one photo from this batch of photos using the sliders in the editing module on the right

11. Create a preset for this batch of photos by clicking the + sign at top of presets (or Ctrl + Shift + N). You could also select a batch of images and click the “Sync” button.

12. Toggle through the rest of images, clicking on the preset name each time to apply the new preset to each pic. Adjust sliders as needed for other photos. You might have to individually edit some photos as necessary. Use adjustment brushes, sharpen, reduce noise, straighten and crop as needed. Remember to use a light touch!

13. Once all photo edits are complete, Ctrl-A to select all photos in thumbnail gallery. For more info on how to edit interior photos, check this post.

14. Batch export photos using these steps:
Export Location: into the same folder with originals but click “Put in Subfolder:” titled “EDITS”
File Naming: Rename to: Custom name- Sequence (Enter a photo title that is good for SEO & Pinterest)
Resize image to fit Long Edge to 900 pixels (or your preferred blog width); resolution 100
Sharpen for Screen; Standard amount
Check Watermark with pre-created logo created in Edit Watermarks
Click Export, and you’re done!
This next step is not required since it takes up a TON of file storage space, but I recommend this extra step if you’re working in print magazines: Don’t resize, and export entire batch a second time to save all high resolution (300 pixels), edited images without logos in a separate folder titled “HI RES”.
That’s all folks! How simple is that? Batch editing, batch watermarking, batch resizing, batch renaming??
I mean, come on. It doesn’t get any easier than that.


If you liked this post, please check out my other photo editing tutorials here:


Seriously seriously LOVED your class! You have made my life so much easier! : ) Thanks again!! Pinning!
Thanks Ashley! Great seeing you at Haven!
AMAZING! I couldn’t believe the impact editing in Lightroom made on your photos. I LOVED your class at Haven. You really explained everything so well. I’m going to practice later today and pin this too. Thanks, Beth! x
Thanks so much Danielle! I’m so glad you came to the class and it helped you! I have had lots of positive feedback so far, so hopefully I’m saving bloggers a ton of time and effort with their photo editing workflow. 🙂
Beth, you gave a great class on Lightroom at Haven. Thanks for the tips and advice and I did learn a few more things. Now I need to upgrade to 5!
Thanks DeDe! It was so fun teaching that class and seeing the “AHA” lightbulbs go off across the room. 🙂 Thanks for coming!
If you want to save a little more time the sync button will let you synchronize a selected group of images to all have the same settings or selection of settings. This video is for LR 4 but it applies in LR5 as well.
http://www.slrlounge.com/school/how-to-use-the-sync-and-auto-sync-functions-to-batch-process-images-in-lightroom-4/
Thanks for that tip, Michele! I did go over the “sync” button in my Haven class, but I need to edit this post to talk about that in further detail. I use Sync for photos in the same batch, but if I’m going to be using the same edits for different batches of photos that’s where I like to use presets. Both features speed up my lightroom editing time for sure. 🙂
Thanks so much for making this info available, Beth! I’ve downloaded and printed. Now all I need to do is sign up for Lightroom5! Missed seeing you this year at Haven but I hope to attend the Country Living Fair in Oct.
Missed seeing you too, Jane! Hope to see you in the fall! 🙂
Thanks so much, Beth! Lightroom is next up on my blog tools to buy!
[…] still have a lot to learn but her class was wonderful. Here is a link to her tutorial from the […]
[…] a Lightroom class on photo editing that was taught by Beth at Unskinny Boppy (check out some of her tips here) I was sold on getting Lightroom 5. It has so many more features, is really easy to use once you […]
[…] single blog post that I write. There is not a day that goes by that I don’t find myself editing a batch of photos or adding watermarks to my pictures. I have shown you guys how to straighten photos in Lightroom, […]
Thank you so much for this post! I’m teaching myself photography, photo editing, and blogging skills all at the same time (which can be overwhelming). It’s hard to find thoughtfully organized tutorials that fall somewhere between too much information and too little. This post hits the sweet spot – I actually read & followed the whole thing! Again, great job, and I will be def be back to read more!
I blog frequently and I really thank you for your information.
The article has truly peaked my interest. I am going to take a
note of your website and keep checking for new details about once a week.
I subscribed to your RSS feed too.